If you think a stool is normally an object that sinks in a toilet or swimming pool this post may be somewhat confusing for you, but educational none the less. Not that anyone has noticed but it has been many moons since my last post, primarily because I have been busy bringing new ideas and designs to life in the shop. At least that is my excuse.
My visit to the emergency room this past Saturday has provided me the opportunity to write again so there is a bright side to every circumstance. I did a serious number on my left index finger with a #7 gouge while I was flushing up thru-tenons on a seat. I will say no more, but I do have cut/puncture resistant gloves on the way!
One of those projects is a set of modern windsor style stools I’m building to compliment a tall cafe table I recently completed. These stools are a great opportunity to share design and woodworking insights that can be applied to many different styles of chairs and stools. I was inspired by the work of chair maker Peter Galbert. I encourage all those interested in the art of chair making to visit all the sites I have linked to below.
My goal for this post is to really step up my game on the education side of building furniture. To that end, I produced some video content that is integral to this post. I plan to continue this level of effort for future posts to enhance the quality of my content. So let’s jump in the pool and get down to business.
Stool Design-
Great furniture design should always result in a piece that is beautiful, useful, durable beyond expectation, and of course comfortable. The primary difference between this stool and most others is the shaping and sitting angle of the seat. As mentioned above the inspiration for this pair of stools came from Peter Galbert’s posts on his “Perch” stool design. My design does differ in a few areas which I will point out as I go along. I will also share photos of my patterns for the seat and legs below in the construction section for the purpose of your guidance.
The Legs –
I am not particularly fond of faithful Windsor design elements, especially the ornate details often found in the turnings of the legs and stretchers. So I began with legs and stretchers that have straight tapers, often these legs are referred to as “cigar” style legs. The legs are also about 4″ longer than an average stool leg to compliment the height of the table they are being paired with. I also like my legs to be a little thicker, about 2″ at the widest point. This adds weight to the undercarriage and lowers the center of gravity preventing the stool from being tippy.
The front legs of my stools are 1/2″ shorter than the back legs which tilts the seat forward slightly once it is all assembled. The result is that your pelvis is encouraged to roll forward and places the spine in a natural and comfortable position when sitting. On the first stool I made I thought to myself “the more forward pitch, the better”….I was wrong and really recommend keeping it very slight!
If you plan to build a stool with a forward tilting seat, your feet must be able to either rest on the ground or some part of the chair or stool itself. Without a place to land the feet, you will want to slide forward. To illustrate how seating angles affect the body, try sitting on something that is pitched backwards with no back rest, it is extremely uncomfortable because your core muscles will fight to stay upright. If you sit on something flat for any extended period of time we tend to haunch over.
The Stretchers –
For these stools I know that unless a client is 6′-6” tall or better, they will need a place to rest their feet other than the ground due to the height of the seat. Taking the overall seat height into account I decided to also raise the height of the stretchers from the ground far above what would be considered standard so that when sitting, an average height person can comfortably rest their feet on the stretchers. In order to accommodate a place for the feet, there are stretchers that run between each leg. In it’s basic form, this type of stool is made up of 4 triangles, which is very strong when joined using traditional techniques.
The Seat –
As far as the seat I was faithful to tradition in the shaping and deep relief of the seat itself. These carved seats are beautiful and comfortable with no pressure points on the bum. There is already a lot of great information out there on Windsor seat shaping so I will not go into detail on it here other than to say be aware in your choice of wood as there is a direct correlation between the type of wood you select for the seat and the expletives that will come out of your mouth while shaping it with hand tools. Unless of course you want to take the easy road and use some type of grinding tool to shape the seat. I cant say too much because I have shaped seats by hand and using a Kutzall wheel. Both get the job done, and both have pros and cons. Hand shaping on softer wood is a very pleasant experience if you have the the right tools and they are sharp. Power grinding is loud, messy, and IMHO is a method that takes more practice to control.
Stool Construction-
Chairs and stools can be quite the mental challenge when you have never tackled one before. However, when you break them down and apply a systematic approach to the construction it can be surprisingly simple with a few tips and tricks. My goal here is to break down the steps so anyone can understand the process of building a stool. There are some specialty tools involved in the process and I will do my best to point those out and make recommendations for alternatives. Build a couple of stools and you will be ready for more challenging chair work I promise.
Wood Selection –
My stool design is made from 7 pieces of wood, a seat, 3 legs, and 3 stretchers. The type and quality of wood you select is very important, you need a good hardwood for the legs and stretchers. Straight grain Maple is the best wood for turned chair parts in terms of holding detail and ease of turning. I used white oak and there are a couple of properties you need to be aware of when turning ring-porous woods like oak and hickory that I touch on below.
When selecting wood for the seat, almost any sound wood can be used so factor in what your aesthetic objective is. Traditionally, a softwood species is used for the seat and then the piece is painted to cover the contrasting colors of different wood species. Softwood is used simply for the ease of shaping but be aware that softwood seats can also be dented easily by keys in pockets and general banging around. The stools in this post are made entirely from white oak. In fact I used the same board for the stool seats as the table top for the purpose of continuity and a custom touch.
For those who don’t have access to good quality chair materials, here are a couple of resources worth looking into. You can purchase maple or oak chair components from Dan Monsees. You can also purchase softwood seat blanks and other chair components from Hancock Forest Products.
There are two major schools of thought when it comes to selecting and processing materials for chair construction. I have used both methods and each has its pros and cons. For the sake of my time I have embedded links below to chair makers who cover each methodology in greater detail than I could accomplish here.
First, there are those who rive or split rough stock out of green/wet logs, using the science of wood shrinkage and expansion to achieve superior strength joinery. Riven stock can be incredible strong and flexible. You can learn all you want to know about the pros and cons of using green wood by reviewing Curtis Buchanan’s YouTube videos or Peter Galbert’s blog posts and videos, both of which are free!
Second, there are those who use air dried lumber, selecting appropriate grain orientation for each part. You can learn all you want to know about the pros and cons of using air dried lumber by reviewing the fantastic information presented in Jeff Lefkowitz’s blog posts on building the Brian Boggs ladder back chair.
Before I move on to how I process the materials I use, I want to point out that I typically use air dried lumber that I saw myself from whole logs. This gives me total control of color consistency (assuming I’m not painting the project), grain orientation, and grain run-out.
I begin the construction process for my stools by roughing out the stretcher and leg blanks and super drying the stretchers in my light bulb kiln. I want to get the stretcher blanks in the kiln as soon as possible in the process and I find that about 1 week in the kiln is sufficient to get the blanks bone dry. I aim to produce a square blank with absolutely no grain run-out. The grain orientation for these blanks is not important because they will be turned round on the lathe. The rough dimensions I shoot for on my stretchers is 1-5/8″ X 1-5/8″ X 16″ long. This size of stretcher stock will work for nearly any stool.
Once the stretcher blanks are in the kiln and the leg blanks are milled up I turn my attention to the seat. Before I move on to the seat please note that I am letting the leg blanks rest and and move around before I continue processing them. For most stools a leg blank with the rough dimensions of 2″ X 2″ X 31″ long is sufficient.
So at this point I have the stretcher blanks drying and the leg blanks resting. I now turn my attention to processing the seat material. The overall dimensions, leg locations, and drilling angles of the stool seats I use is based on Peter Galbert’s Perch seat pattern. The thickness of the seat can vary depending on the wood you use. General rule of thumb is the harder the wood, the thinner the seat can be. I shoot to start with a 2″ thick blank no matter what kind of wood I’m using which allows the seat to be relieved deeply and results in greater comfort. Below are detailed photos of my seat pattern.


Stool Seat Pattern
The above photos and links should get you to the point where you can produce your own pattern.
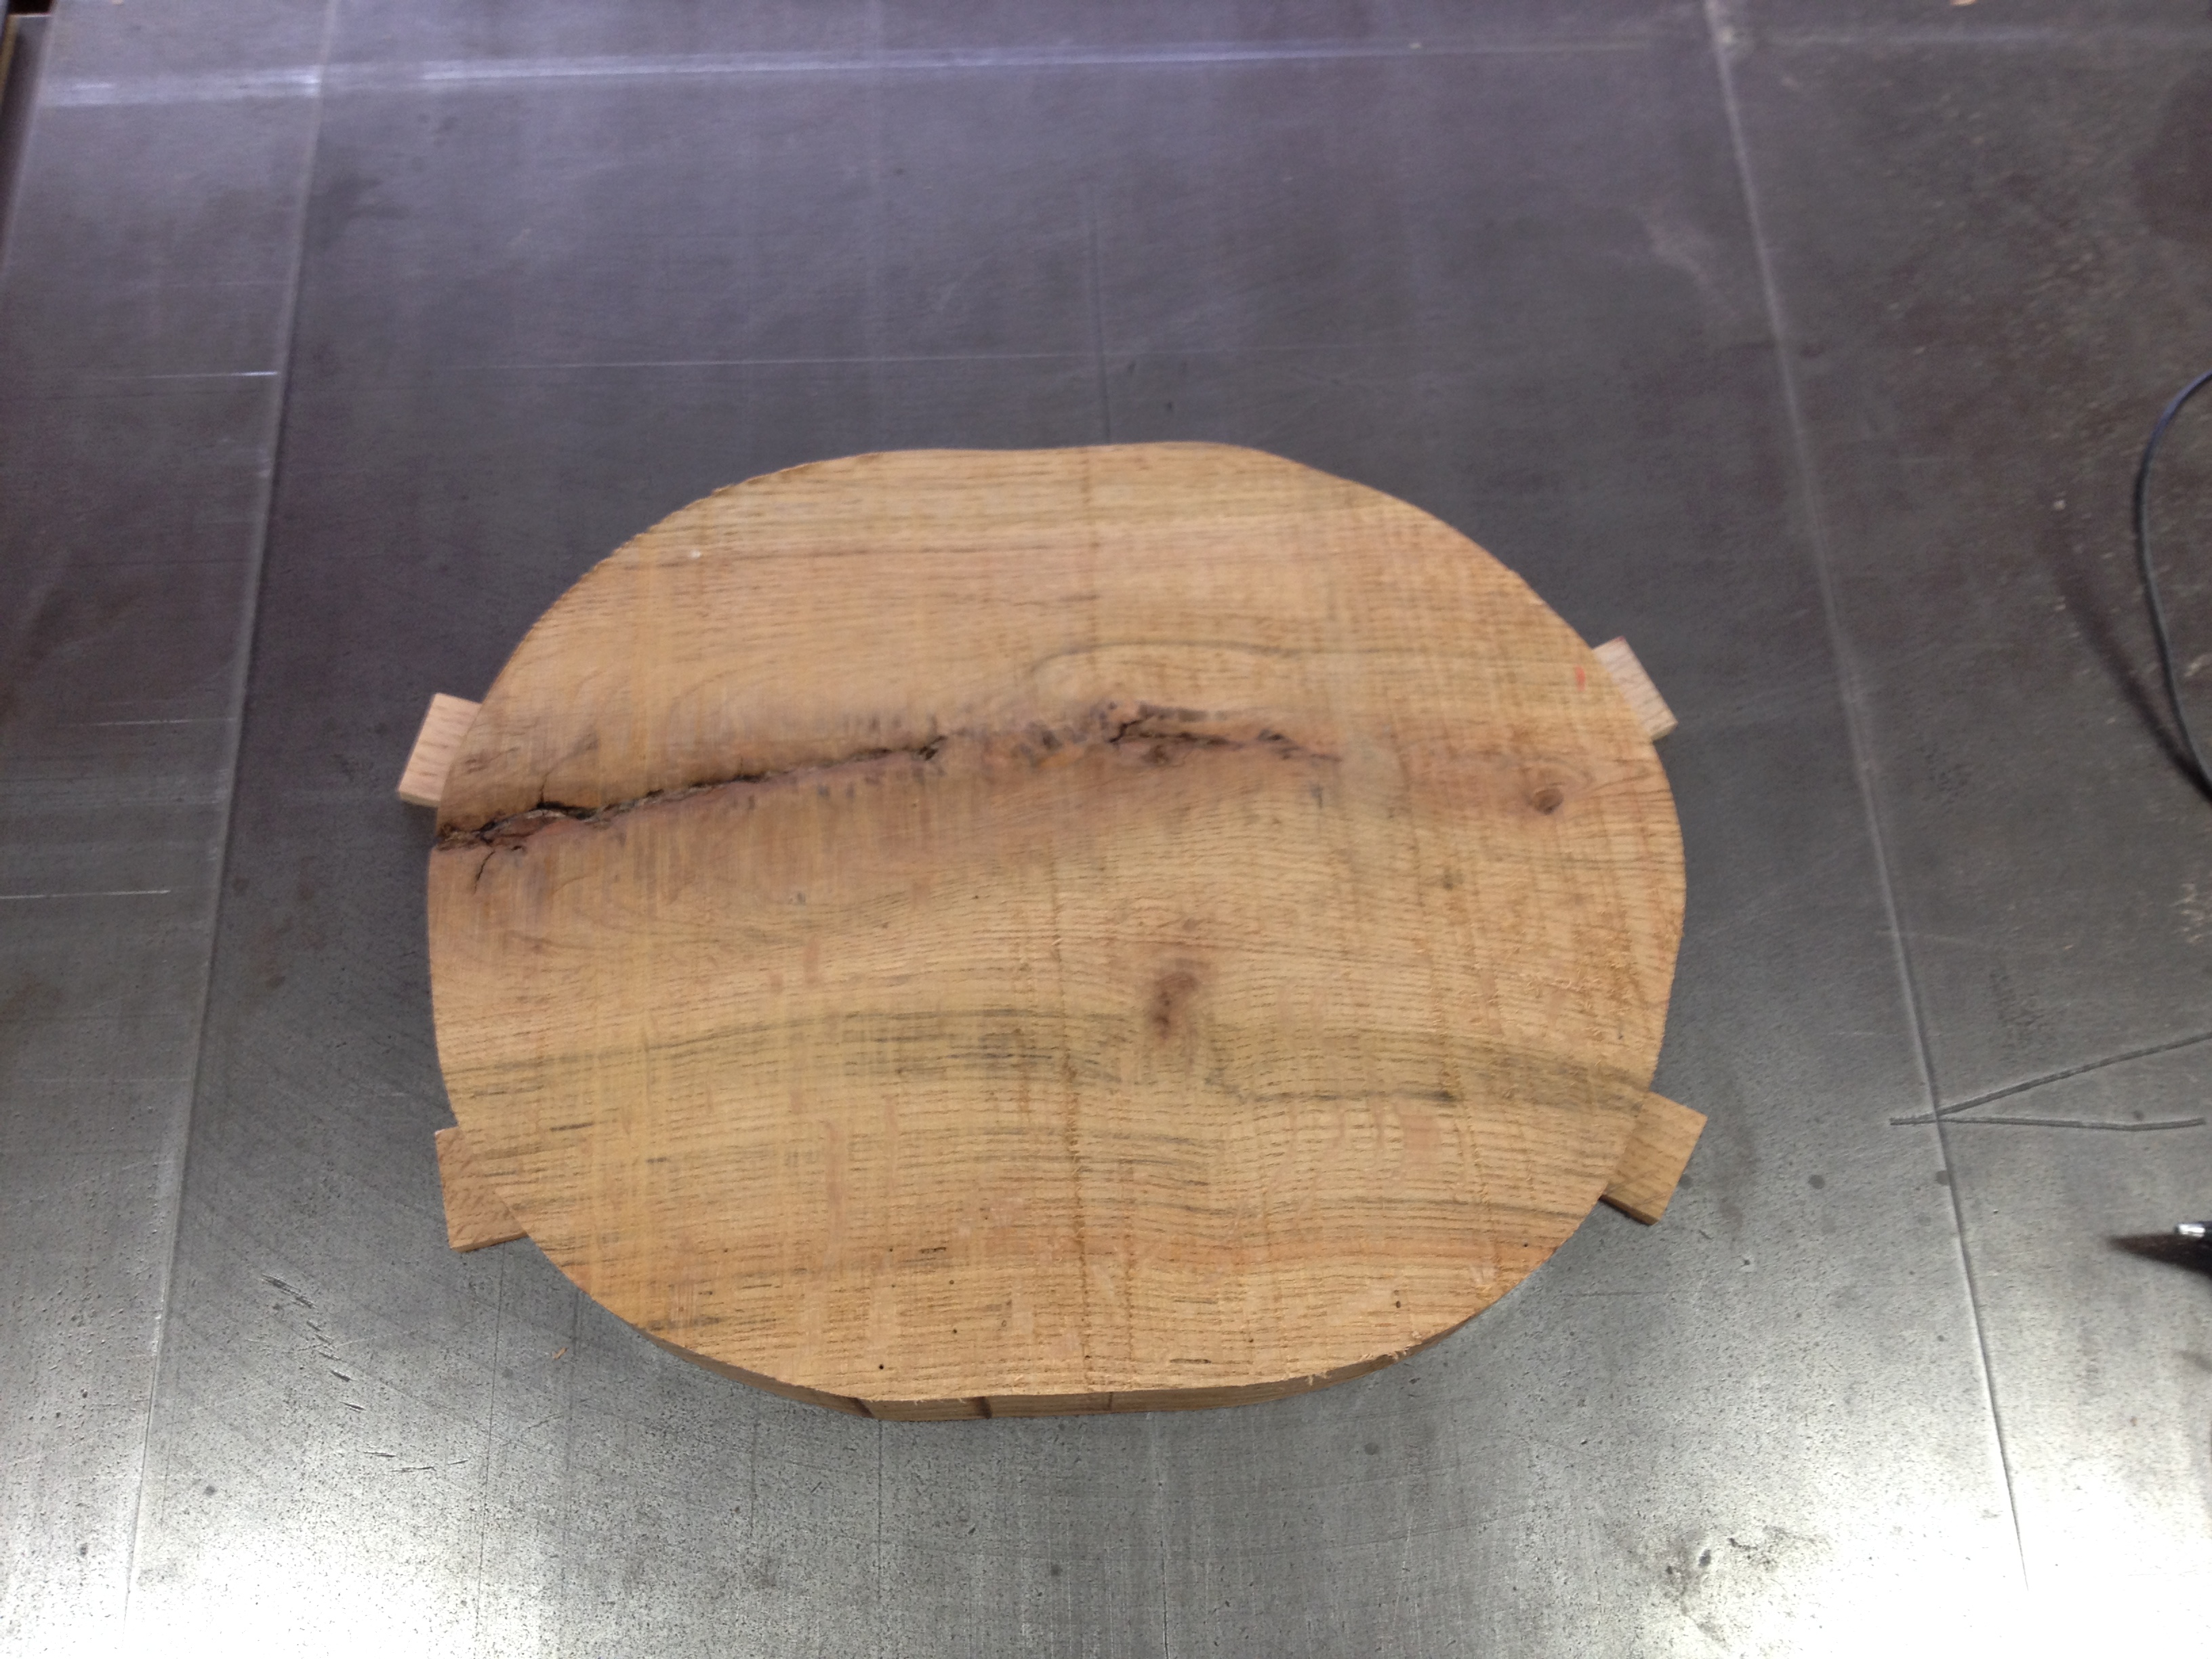
The first step in the process of creating the seat is to cut out the seat from a +2″ thick blank and flatten the seat blank to a final thickness of +/-2″. I cut out the seat blank on my bandsaw following the line I traced on the blank from my pattern as close as possible. This does not have to be perfect but needs to be close. Don’t get hung up on cutting the perimeter exactly!
I am fortunate to have a 12″ jointer and a 13″ planer. The seat is 12″ deep, even for my jointer it’s a stretch. Most folks don’t have a 12″ jointer but most do have a 12″ or larger planer. With that in mind I want to show you an easy process to flatten seat blanks using only a planer. You can also flatten your seat blank with a jointer plane by hand which is also a fine method.
To flatten the seat blanks with the planer I begin by placing the blanks on a flat surface with the concave face of the board down. I then use short wooden shims to remove any rocking and secure them with hot glue. I hot glue the shims on the top and bottom to ensure they do not move when traveling through the planer. The photos below illustrate this process. You could use a planer sled but it is not necessary if the wood you are planing is long enough to contact both rollers when going through the machine.


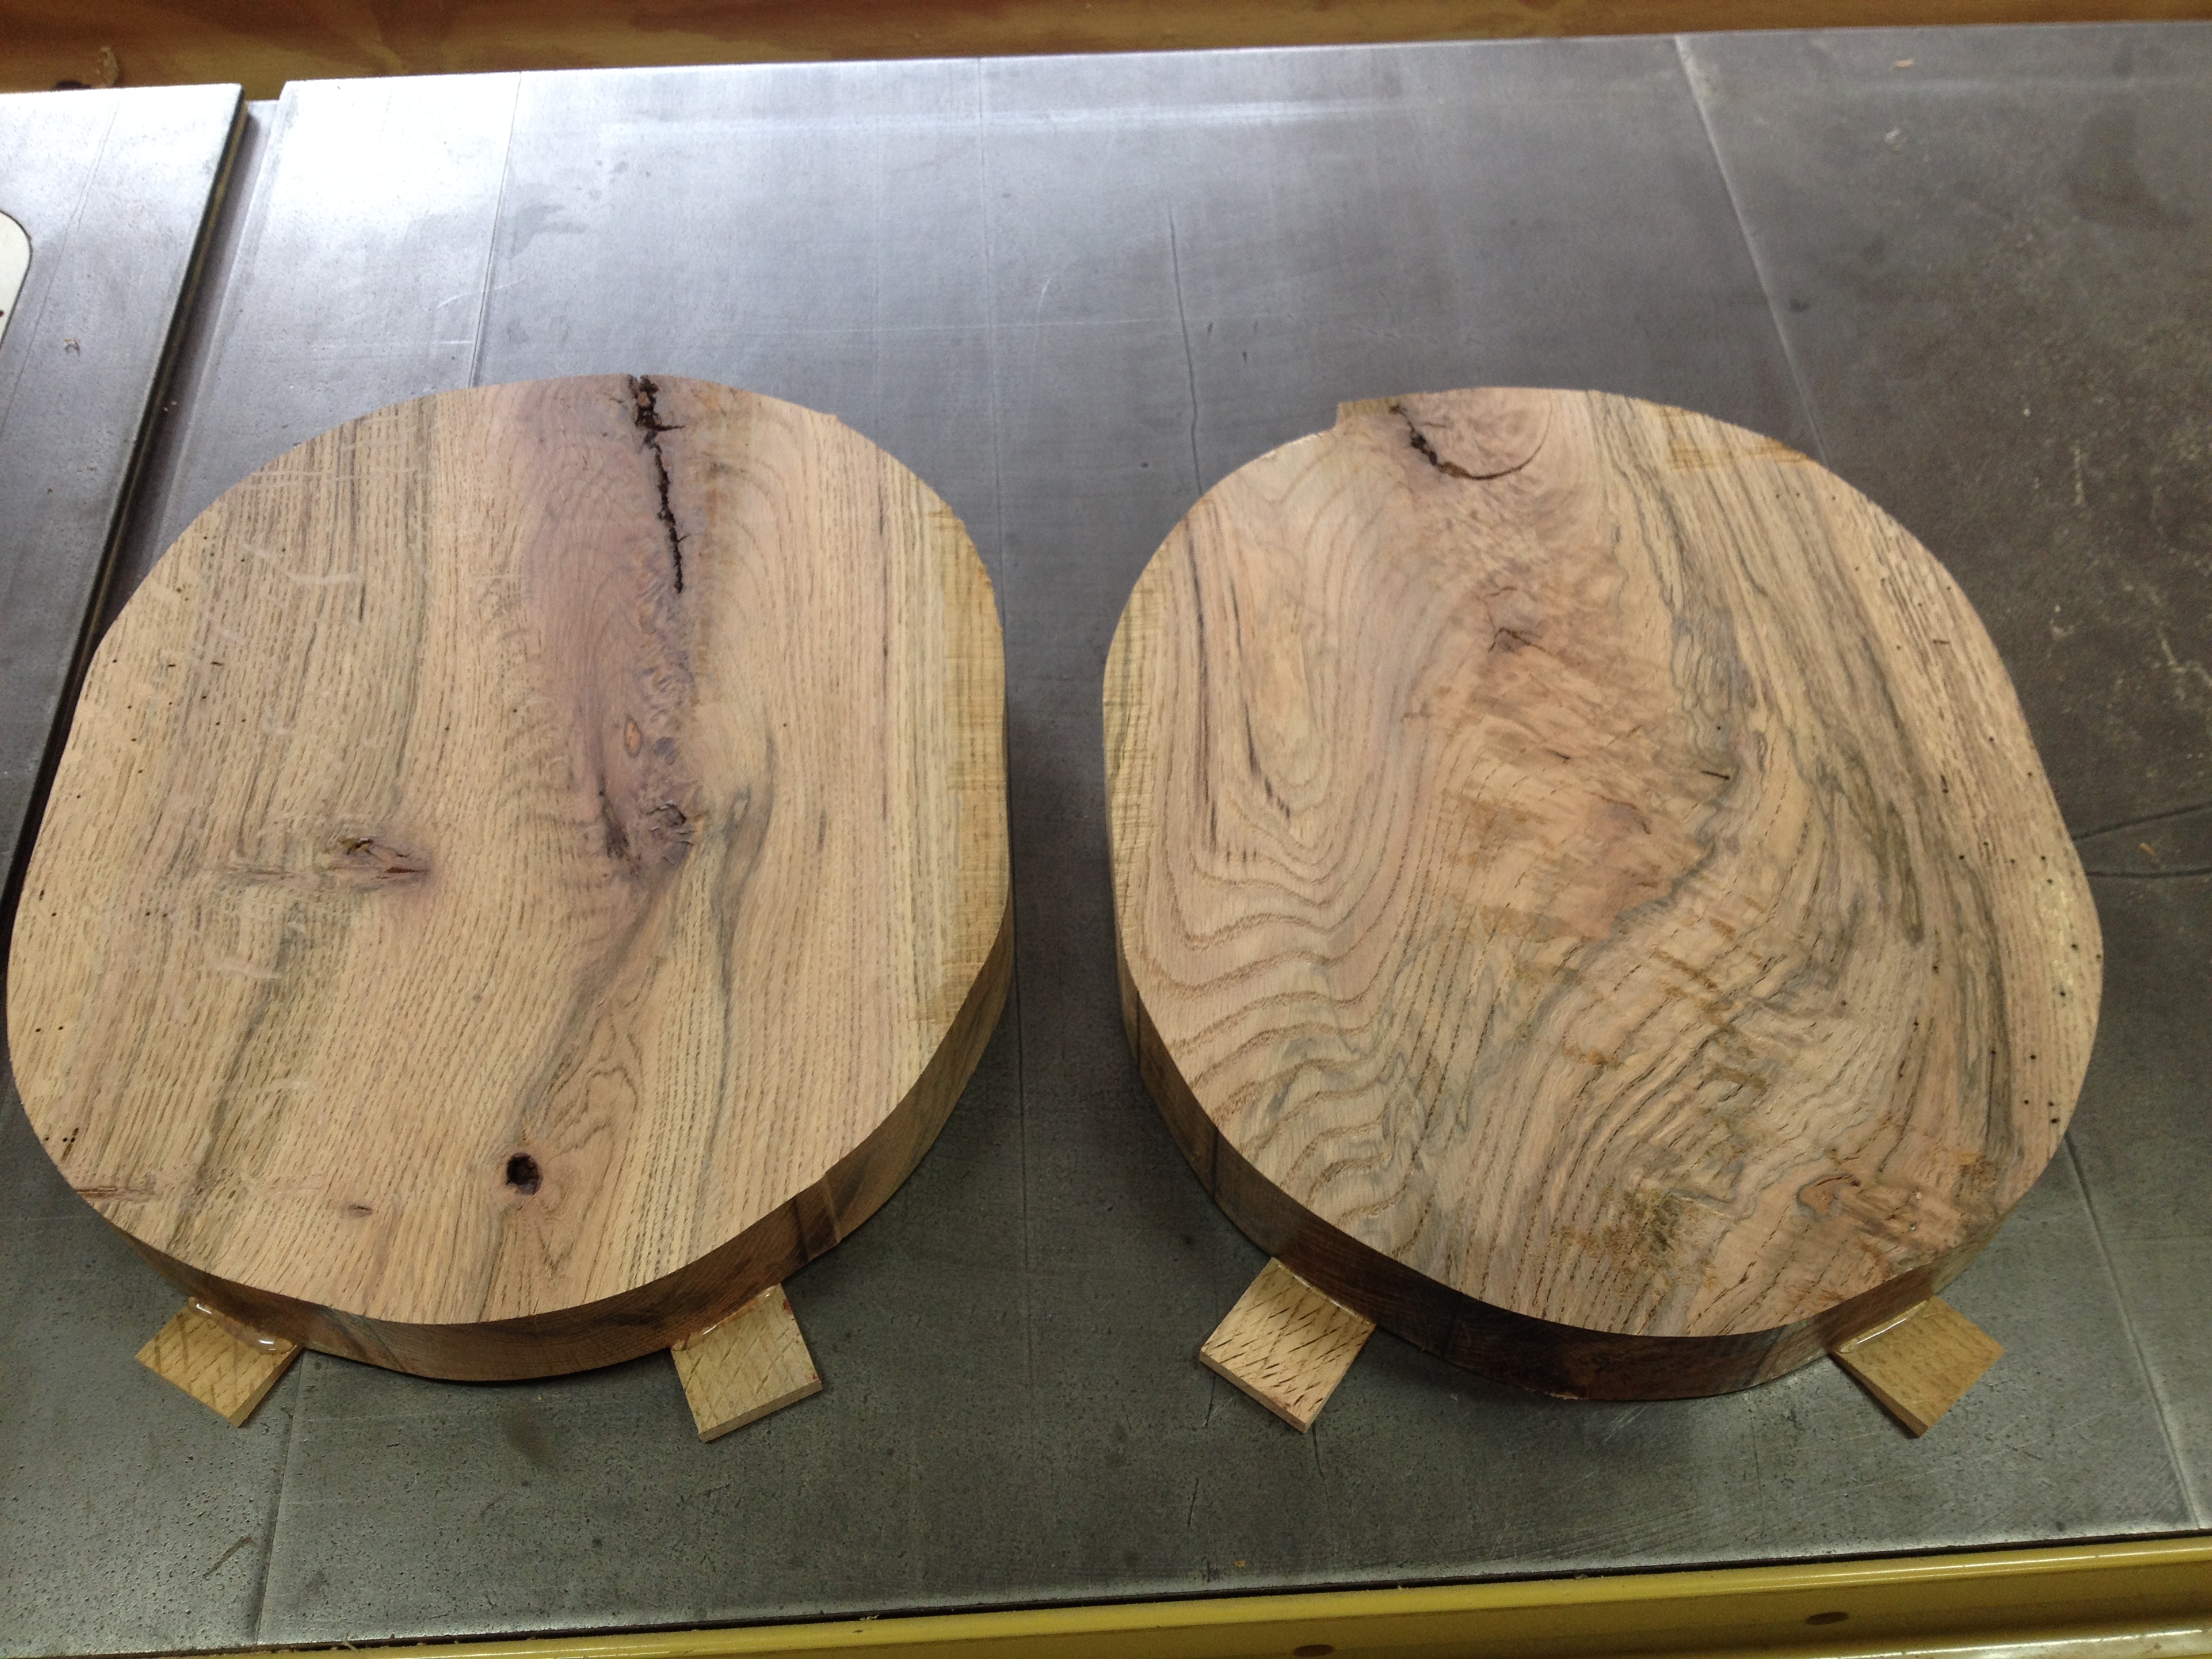
Here are the seat blanks after passing them through the planer several times. If you have some unplaned areas in the middle of the blank that is fine because the middle of the seat will be cut away during the shaping process. Once you have one face flat, the shims will pull off fairly easily and you can pass the opposite face through the planer.
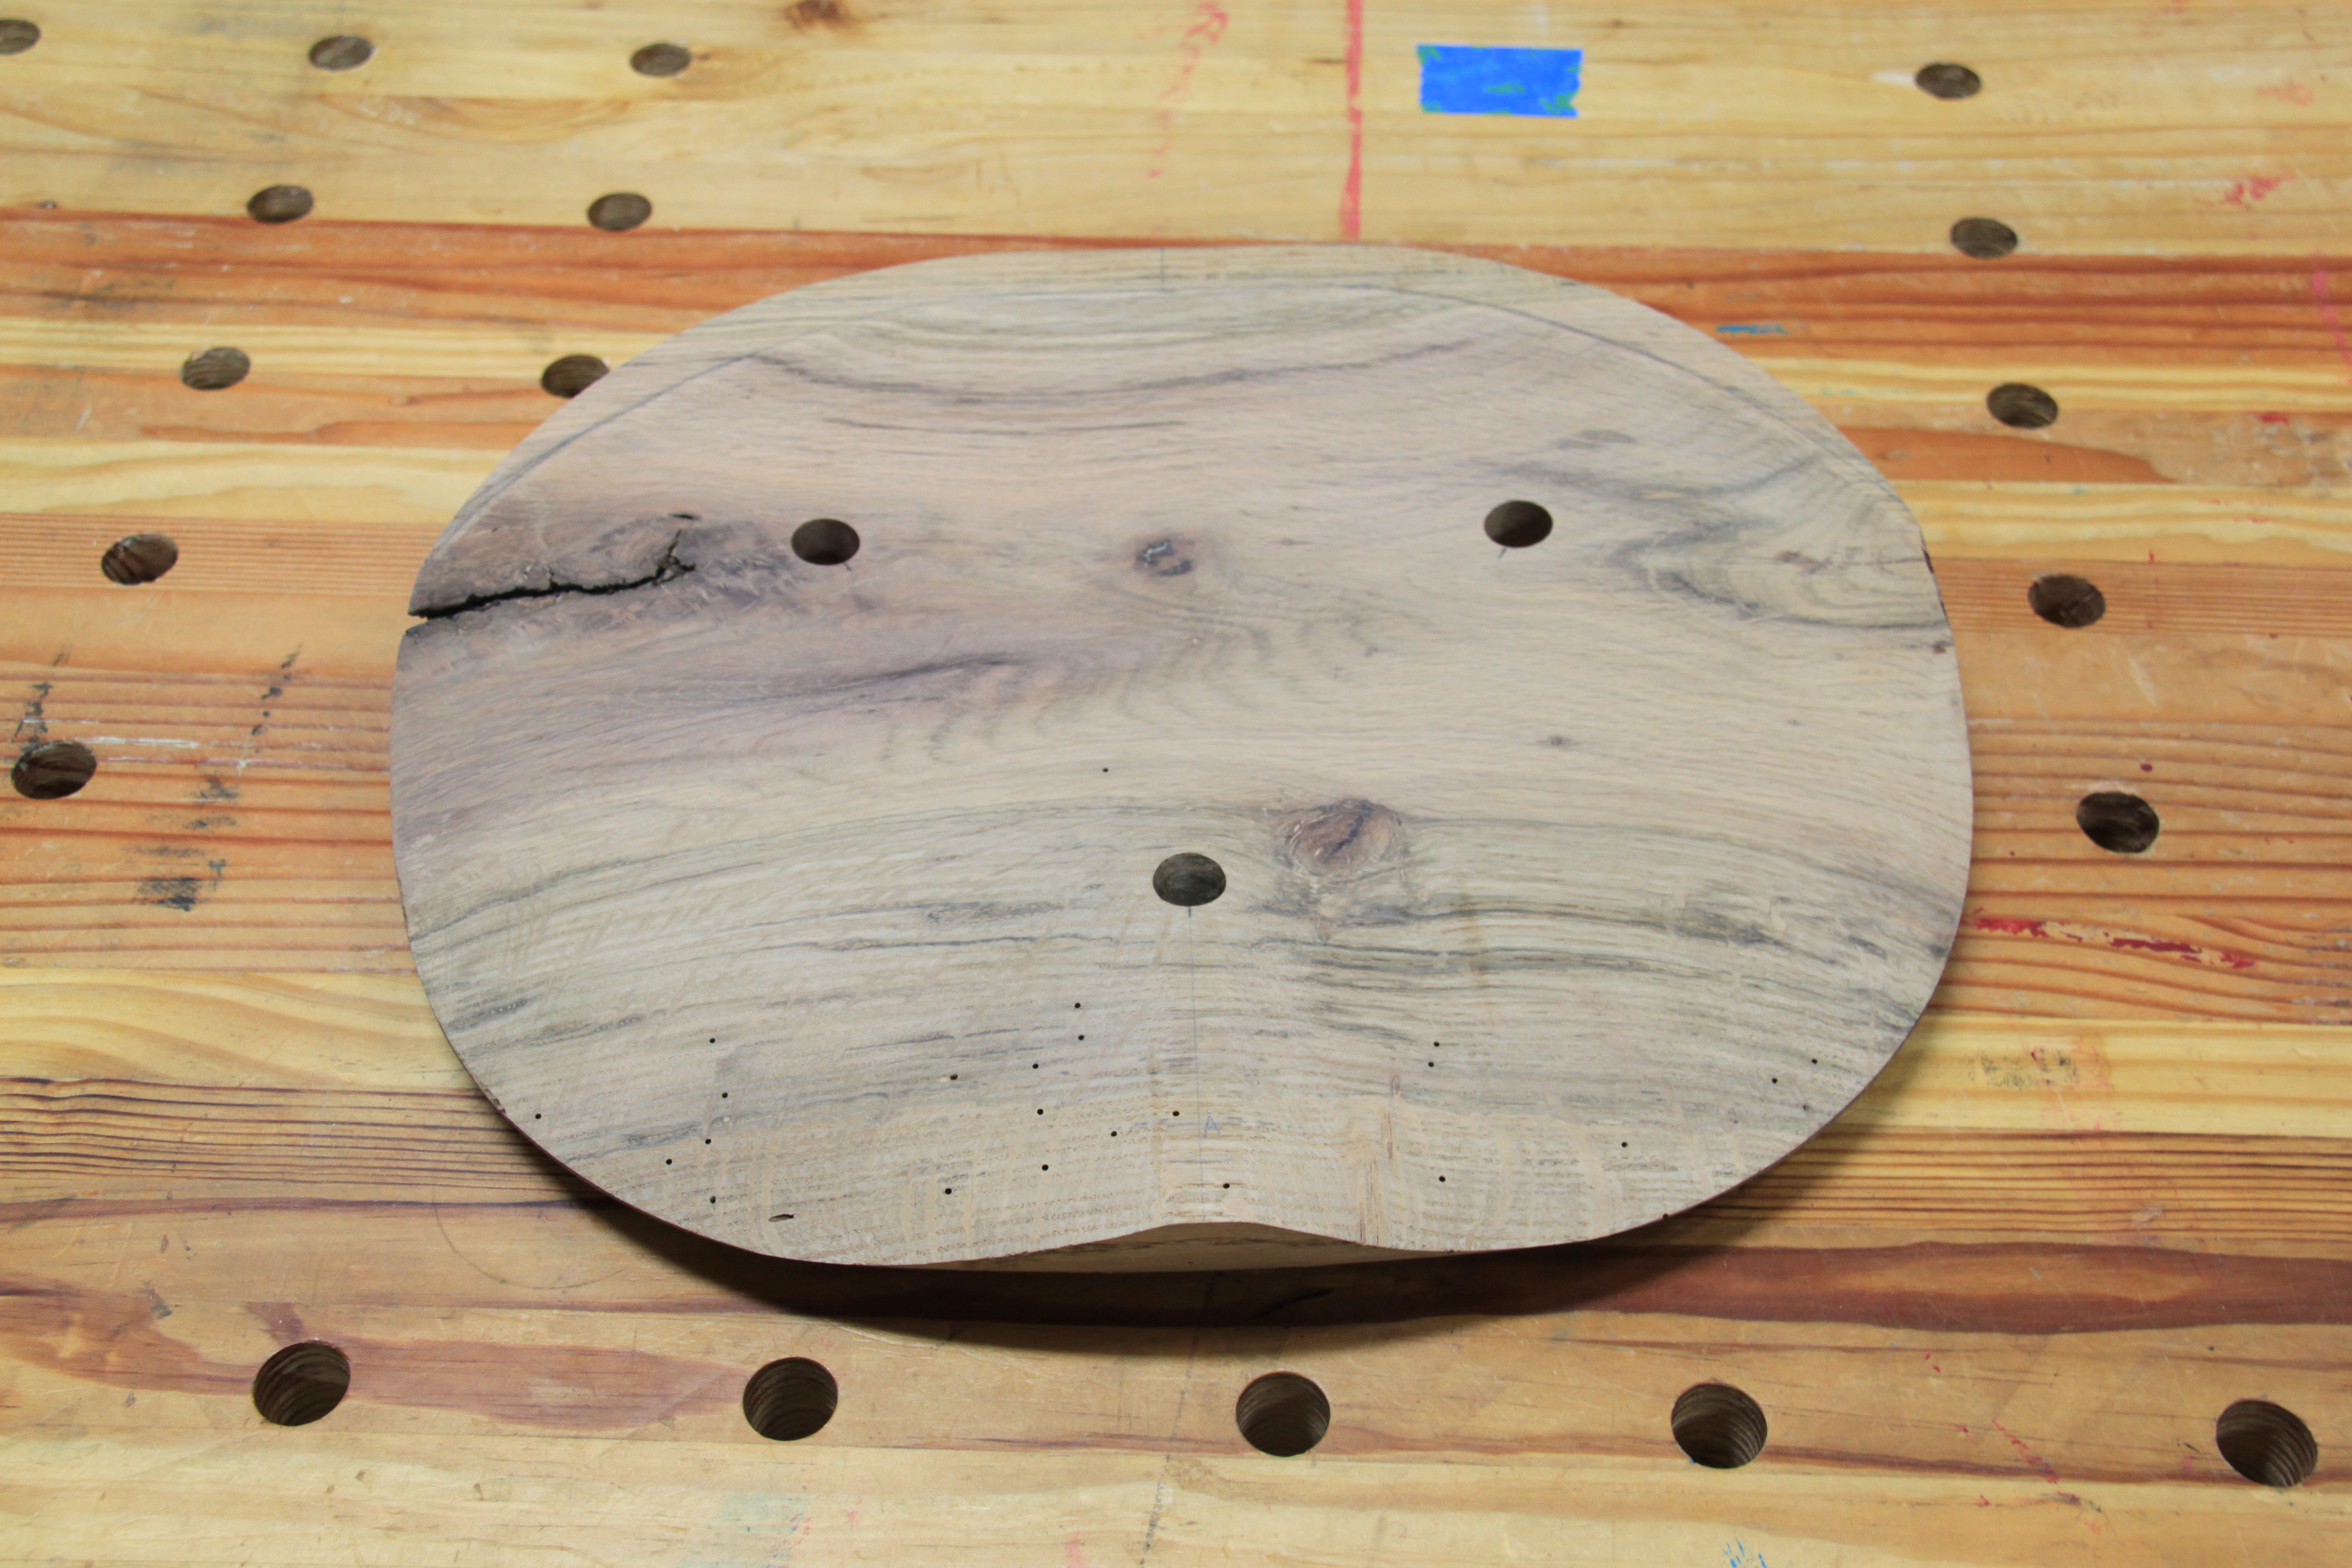
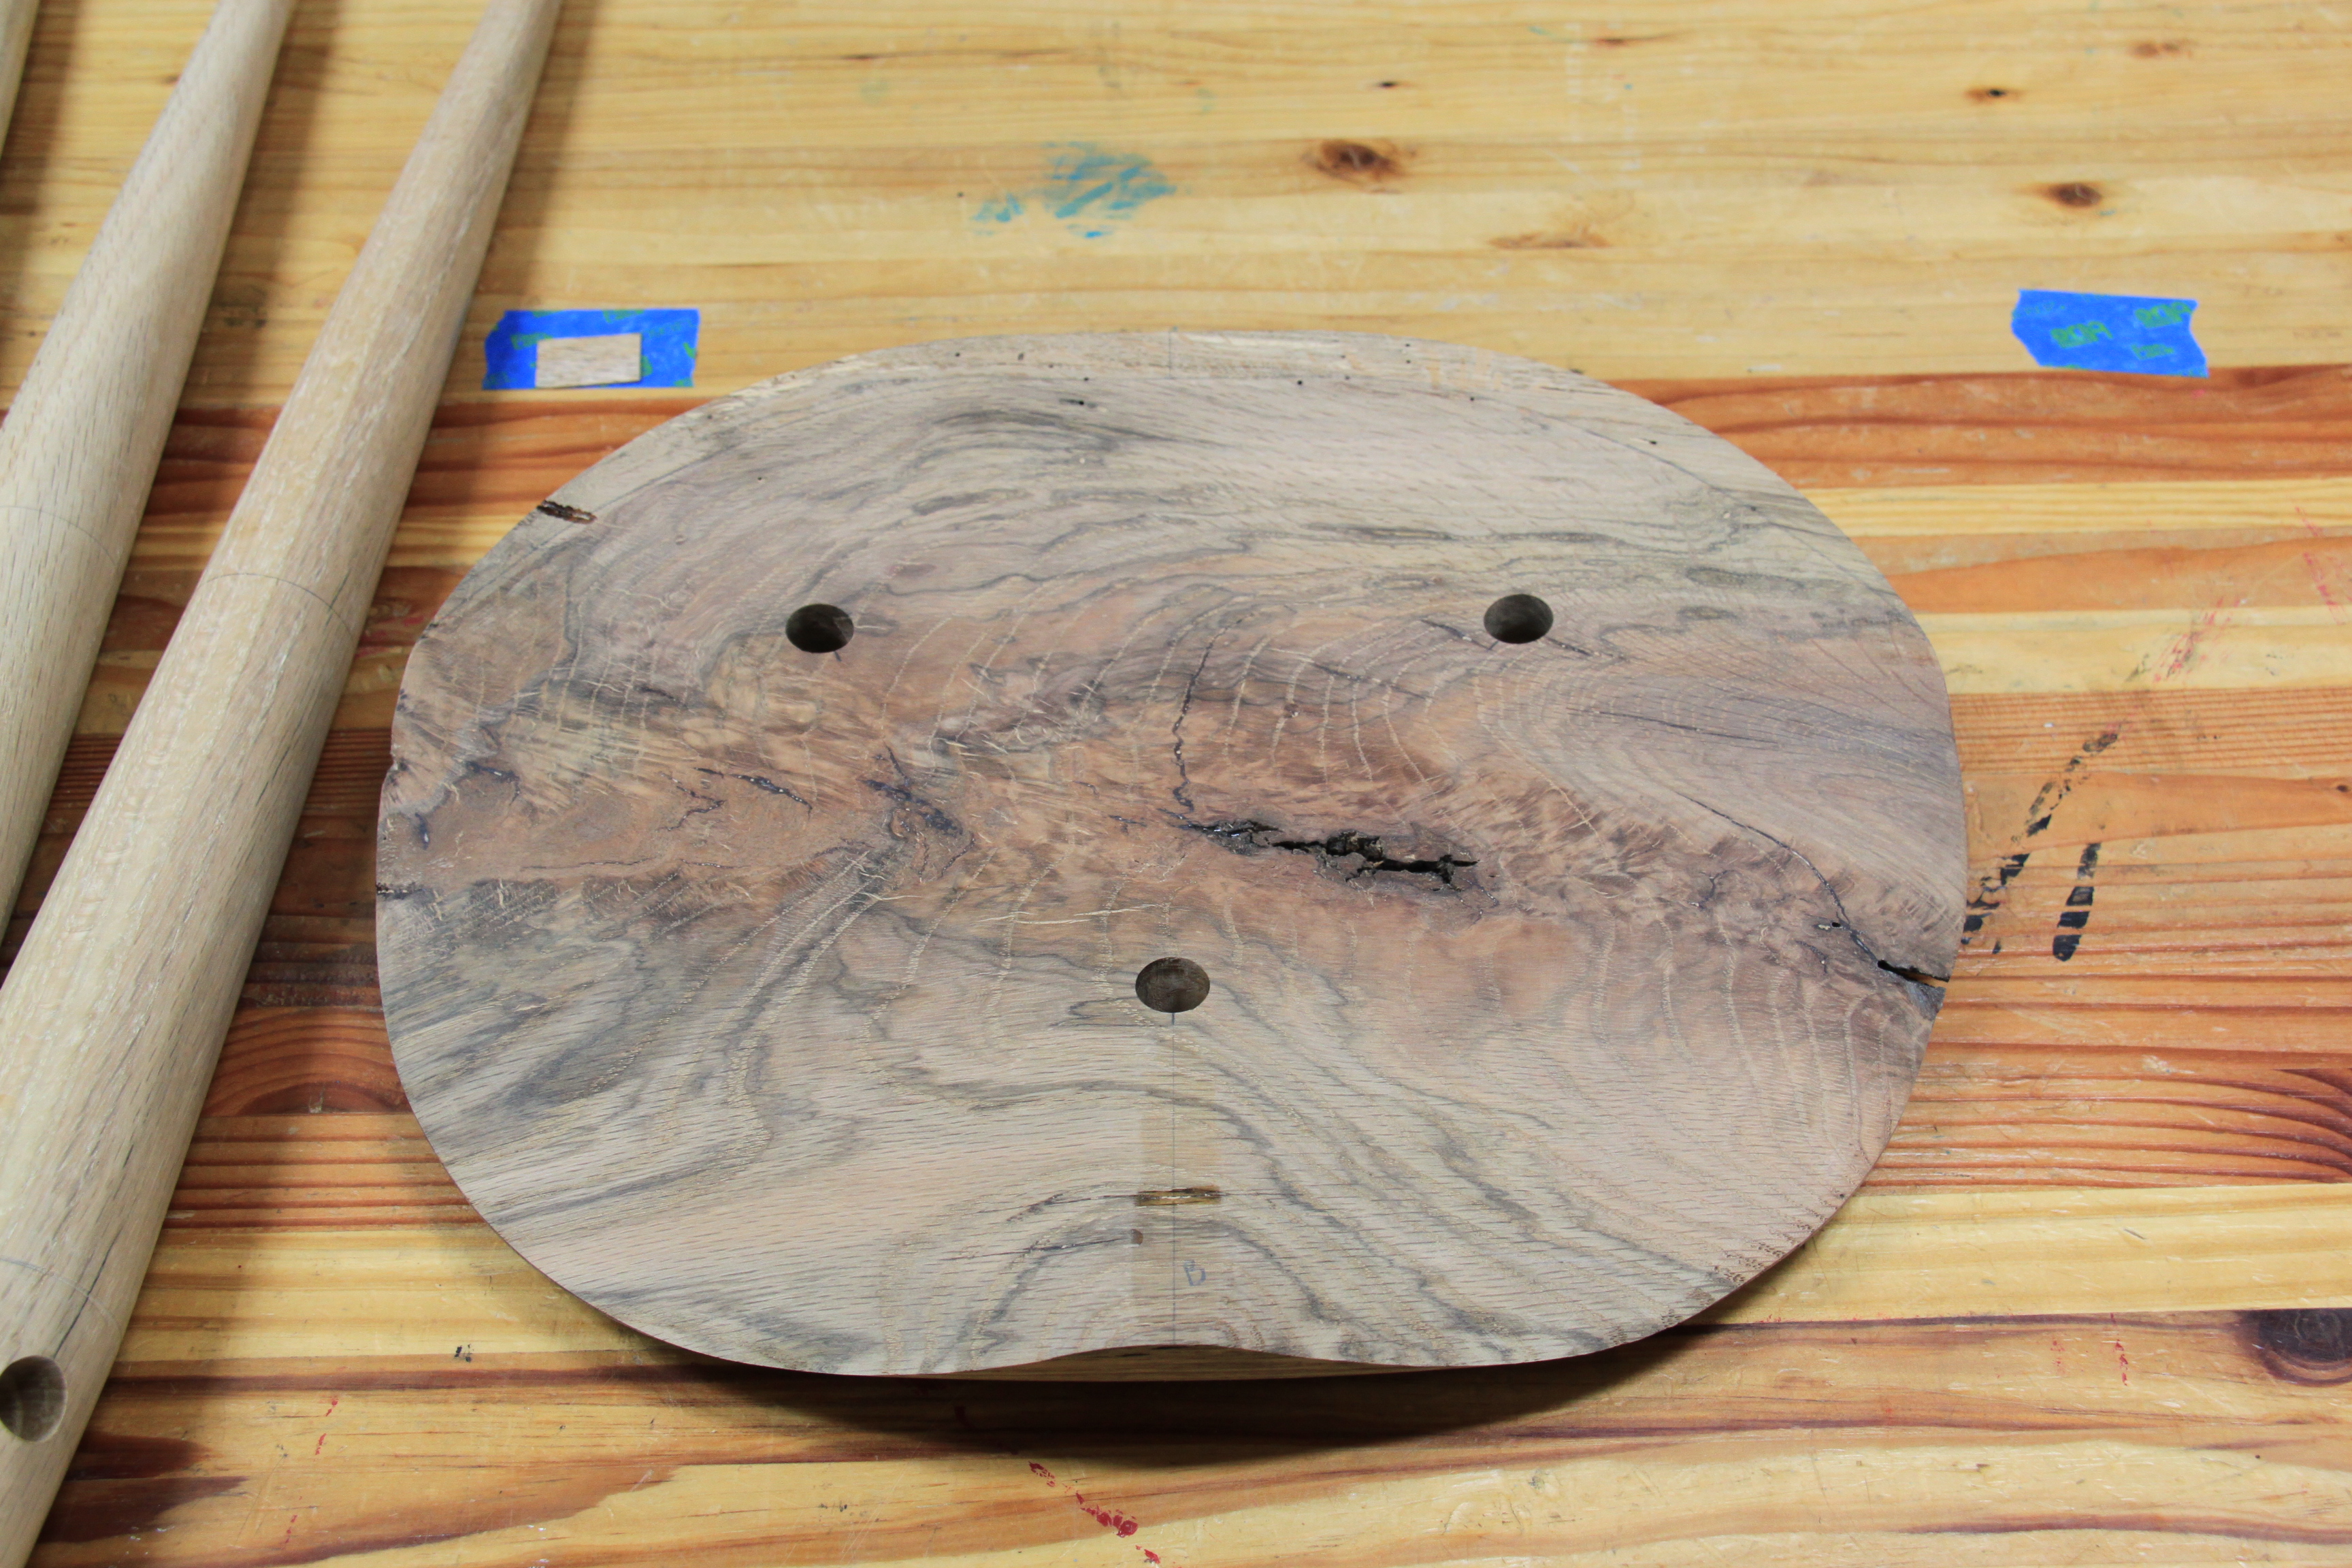
Now that I have a flat seat blank, I draw the sight lines across the face and carry those marks squarely down the sides of the seat blank (I will explain why I carry the sight lines down the sides of the seat blank below). I also mark the center points for the 3 legs from the seat pattern.
You can transfer this information from the seat pattern on the top or bottom surface of the seat depending on your preference and method of drilling. However, it is very important to note that the leg center points on my pattern are laid out for the top of the seat. If you drill the holes from the bottom of the seat through to the top of the seat, these center points will need to be offset along the sight lines at the drilling angle. For example, the front leg center point is located 2-3/4″ inches from the front edge of the seat on the top surface and centered on the width of the seat. The drilling angle for the front leg is 22 degrees, so on the bottom surface of a 2″ thick seat blank the front leg’s center point will be about 1/2″ closer to the front edge.
With the layout information transferred, it is now time to drill the 5/8″ diameter compound angle holes for the 3 legs. There are many ways to accomplish this from hand drilling with a brace, an electric drill, or on a drill press. Many people are hesitant when it comes to drilling compound angles so I have taken what I’ve learned and adopted a process that is dirt simple and accurate.
For explanations sake, when you look at a chair or stool from the front which has legs that sit at a compound angle, the front legs are pitched toward you, this is referred to as rake. And commonly the legs will also pitch out to the sides, this is referred to as splay. The combination of these two angles is called the resultant angle. Now matter how you accomplish it or what you call it, you are always shooting to drill the resultant angle.
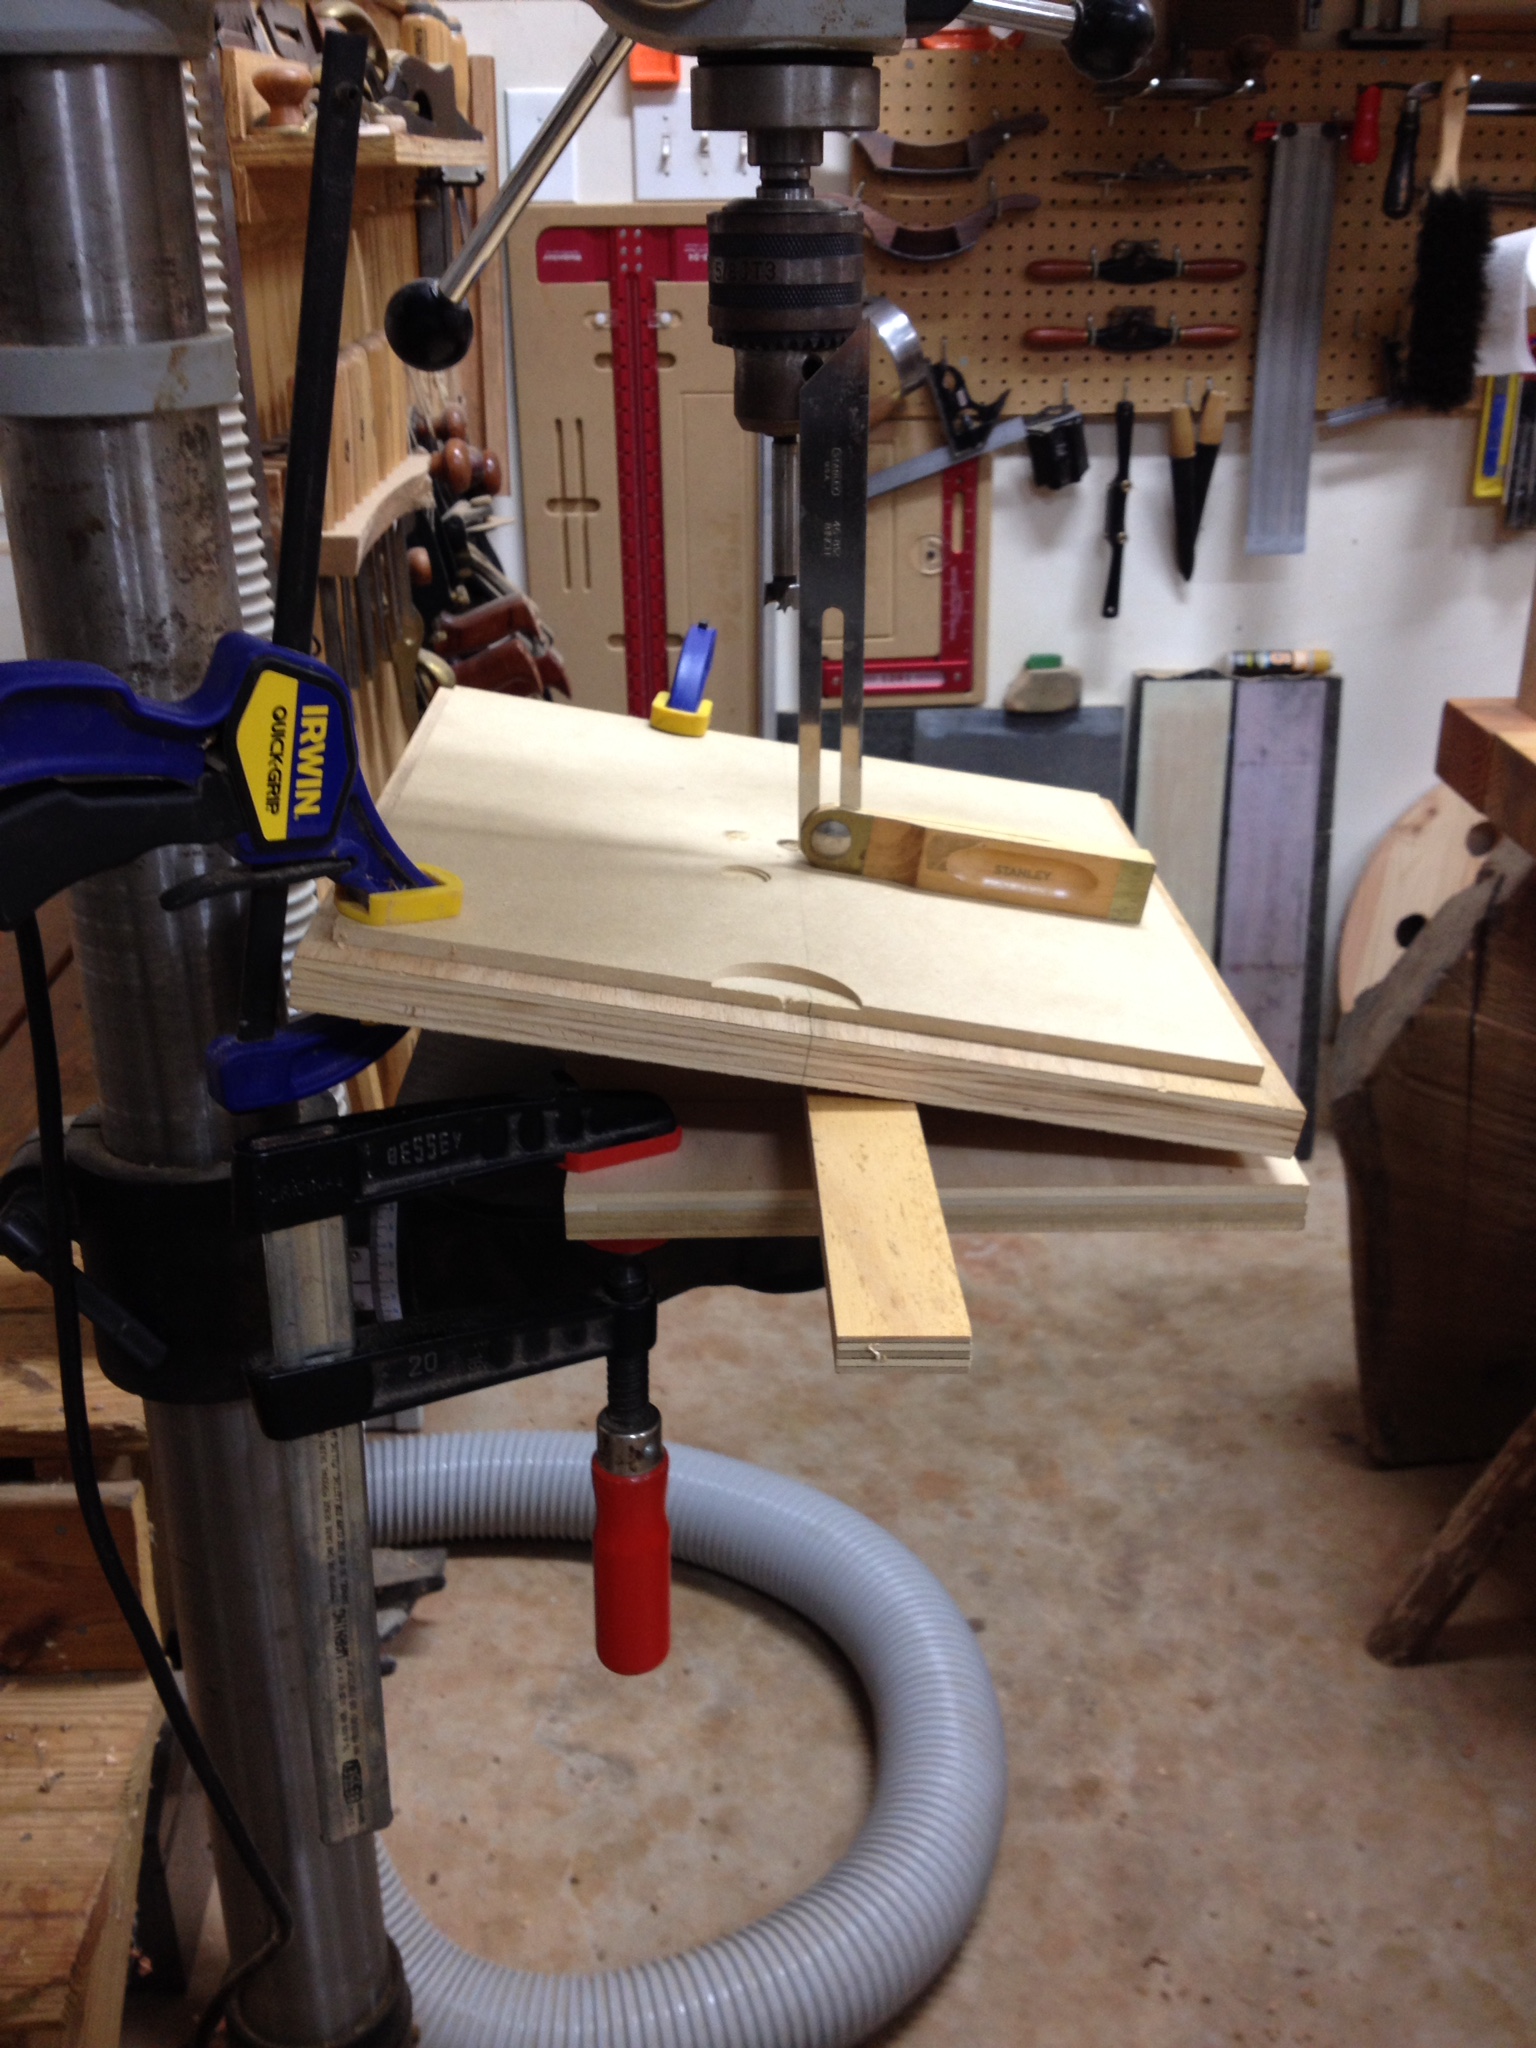
I prefer to use a drill press and forstner bit for this task. Using the drill press and a simple platform jig allows me to drill compound angles with great accuracy without tilting the drill press table. The jig is made from two pieces of plywood and two cheap hinges. The plywood is sized to fit my drill press table so it can be clamped to the table securely. The bottom piece of plywood for my jig is 14″ wide by 10″ deep, the top piece is 14″ wide and 13″ deep.

The key to using the jig is drawing a straight line across the top surface of the jig roughly centered on the piece of plywood and aligning the sight lines drawn on the work piece to the line on the face of the jig. It is important to align and clamp the jig so the center line is perpendicular to the drill press column. I just eyeball it. This jig allows you to set any drilling angle by tilting the top surface. I hold the top surface in place by shimming between the top and base with whatever scraps I have laying around. To align the work piece on the jig to account for the compound angle I align the sight line on the seat blank to the center line drawn on the face of the jig. I draw the sight lines squarely down the sides of the seat blank to make it easy to align the sight lines to the line on the jig.
I marked the two drilling angles on my seat pattern to reference during this step. The front leg has a drilling angle of 22 degrees and the two back legs have a drilling angle of 10 degrees. I set my bevel gauge to the drilling angle of 22 degrees for the front leg first. The front leg is the easiest to align because this leg has no splay.

With the bevel gauge set, I transfer the angle to the drill press setup by aligning the gauge to the shaft on my drill bit. It takes a little back and forth to get the drilling angle set and the sight line aligned but after using this method a few times it becomes easier and easier.
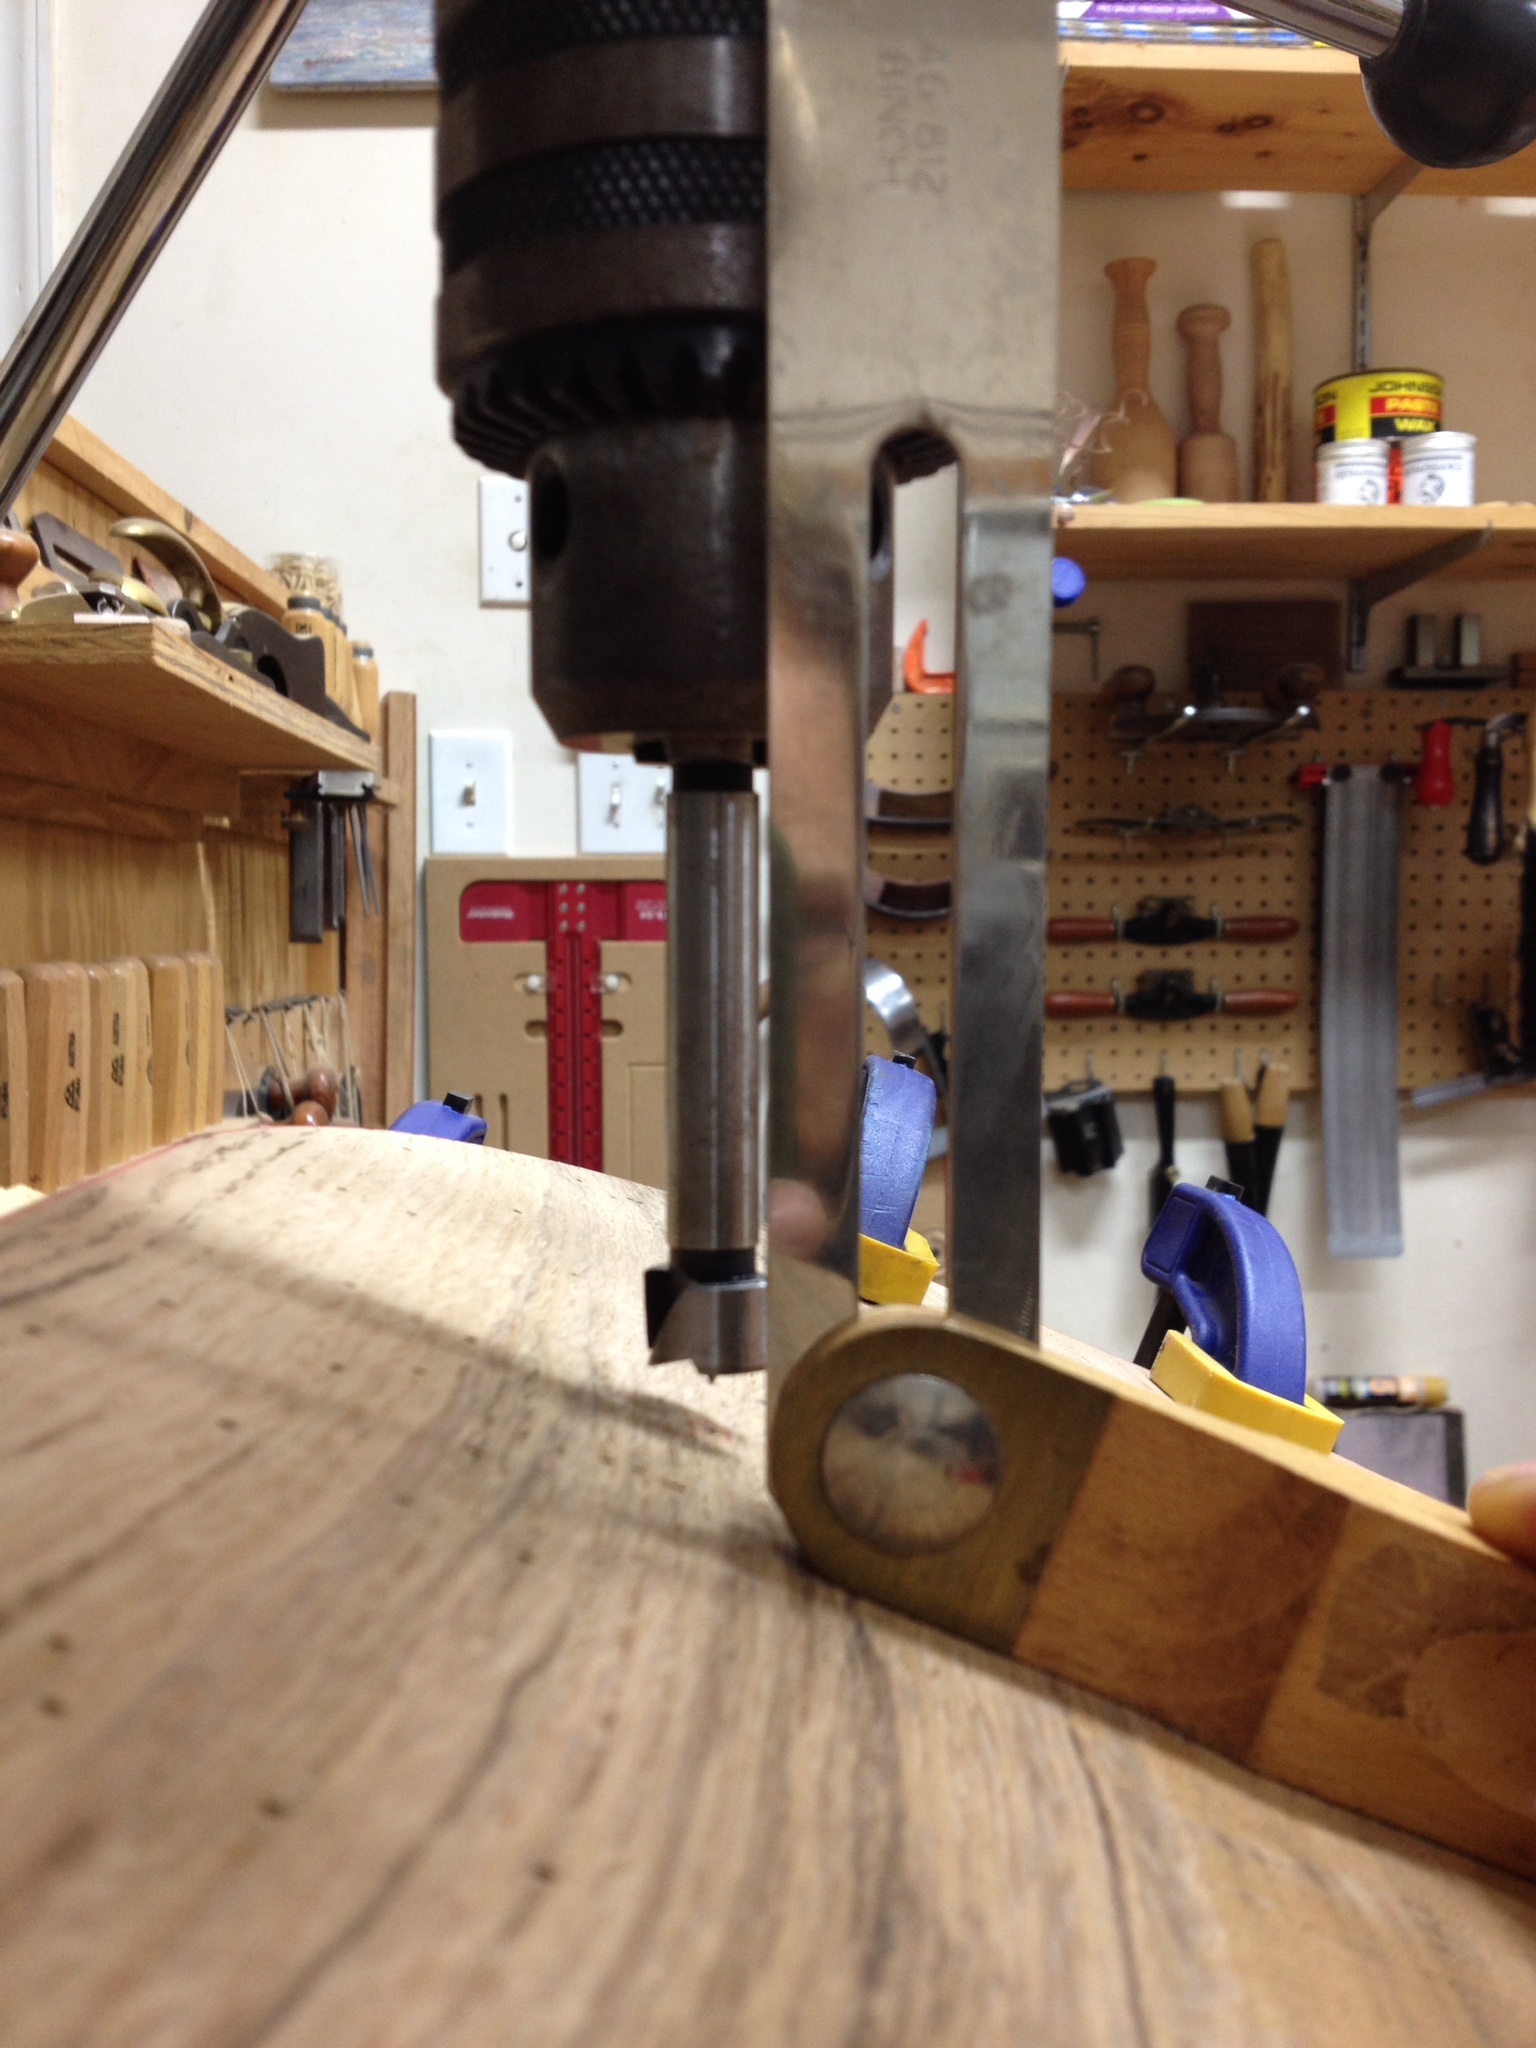
Here is the seat blank all ready to drill for the front leg.

I drill out both front leg mortises on the same setup for efficiency sake.
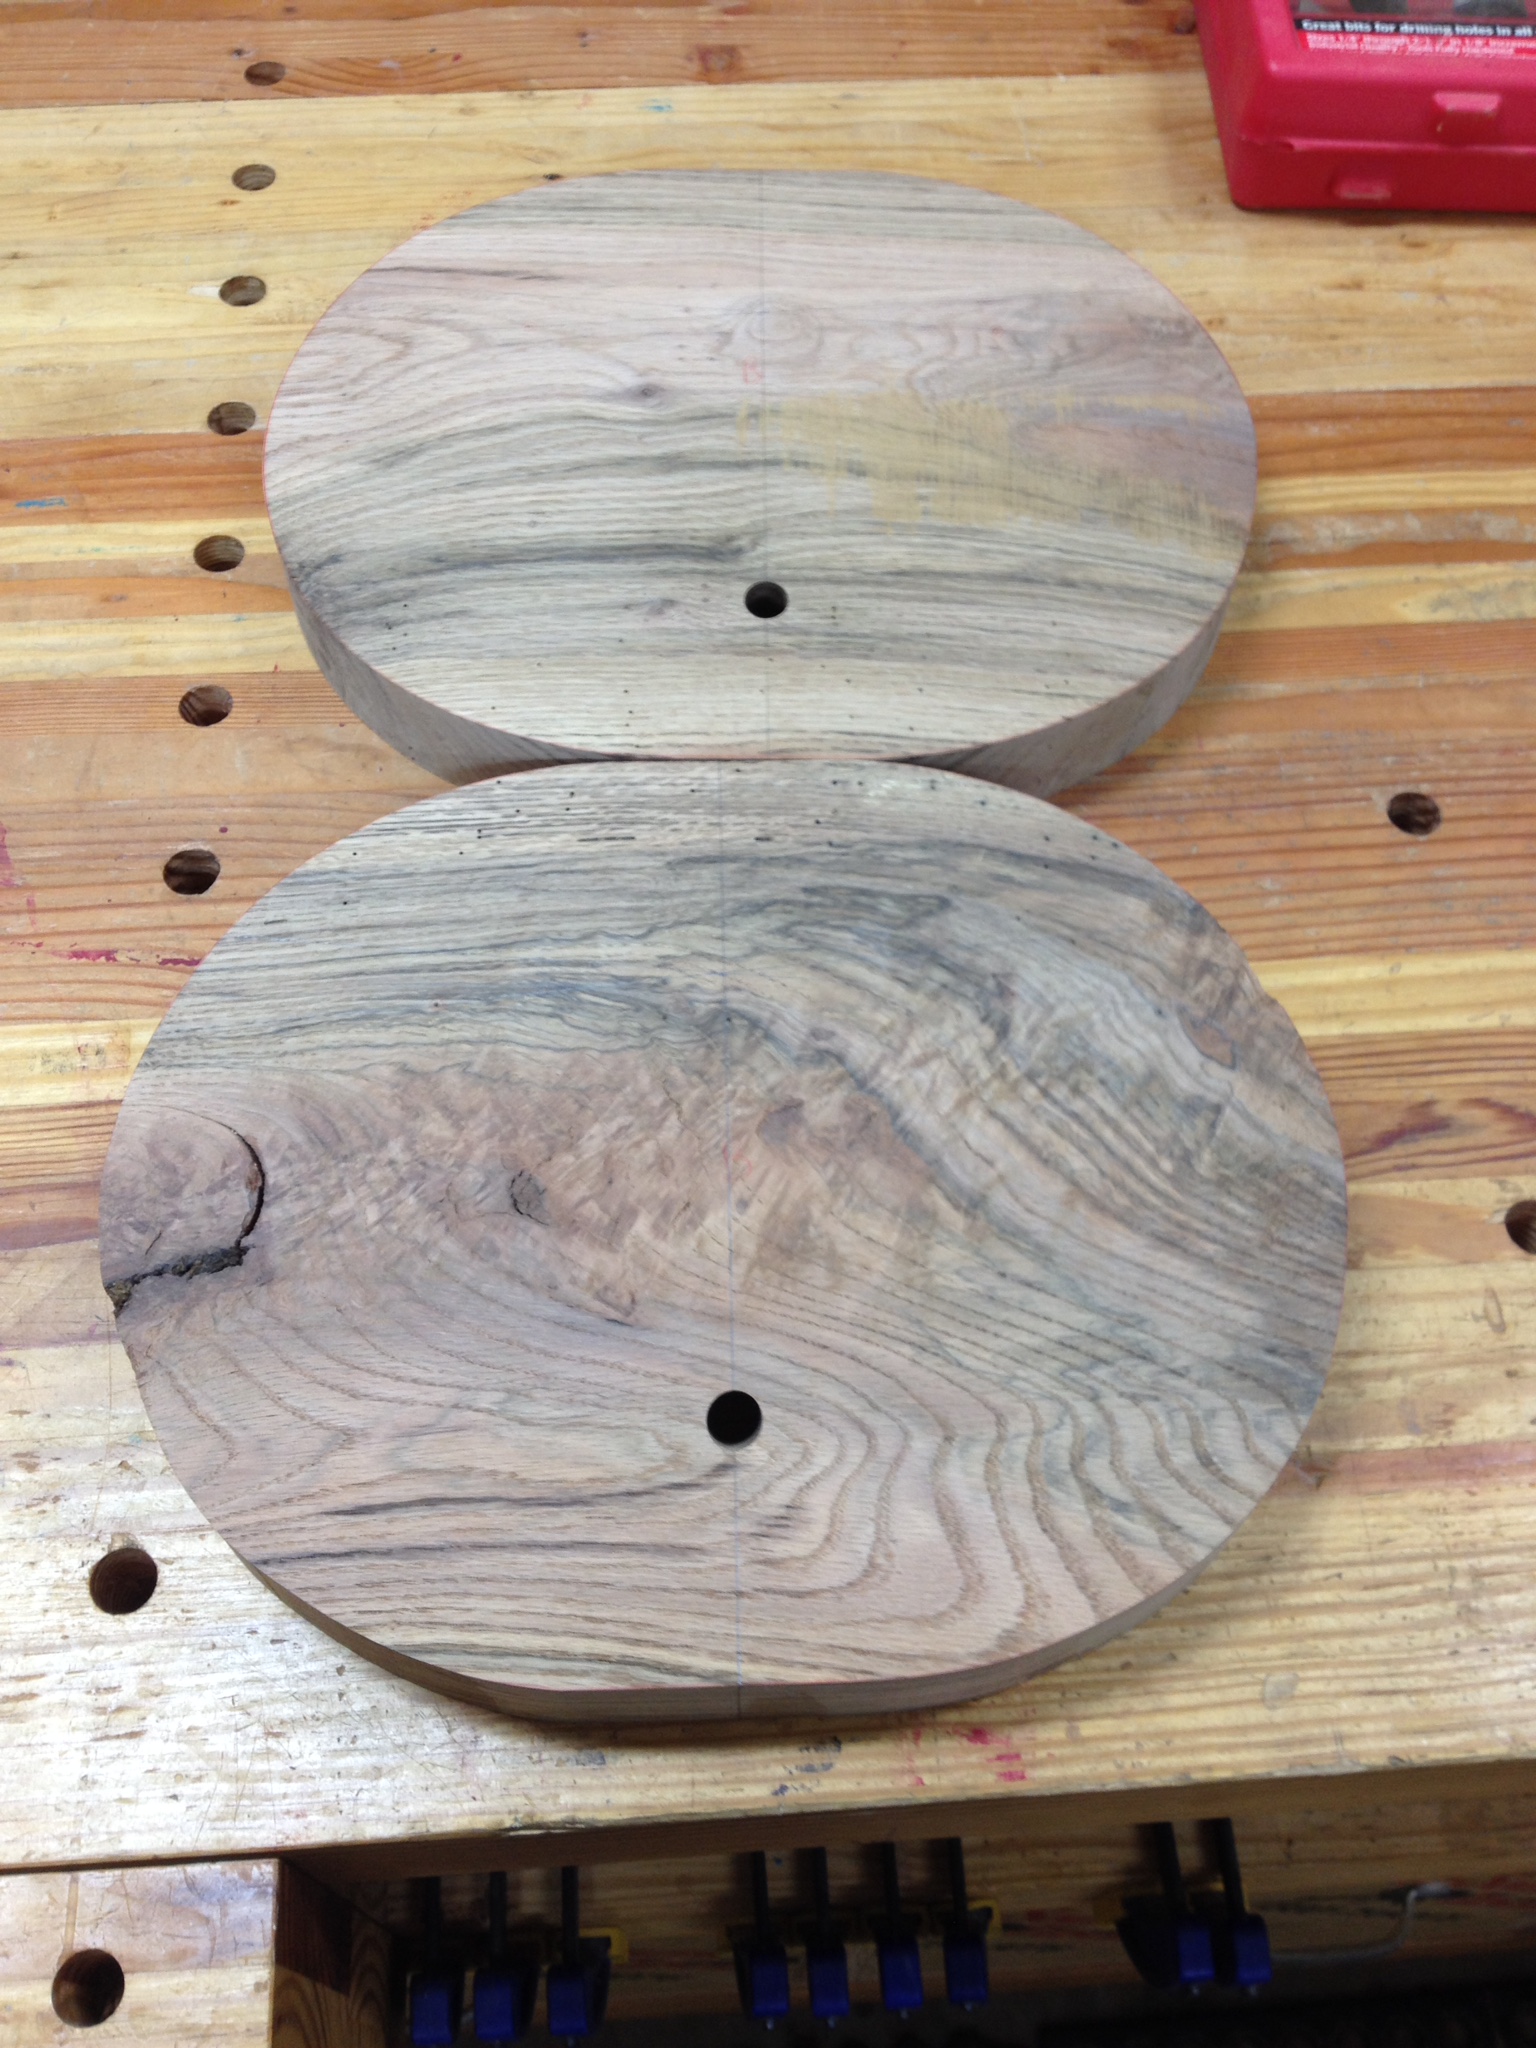
I follow the same procedure for drilling the back legs at the 10 degree drilling angle.

Here is one of the seat blanks aligned for drilling the rear leg holes with the jig set for a 10 degree drilling angle. This does not have to be perfect but I aim to be as accurate as possible. Any slight discrepancy in the drilled holes will be accounted for when reaming the holes, and when marking and measuring for the stretchers later.

 .
.
Assuming the holes have now all been drilled using the procedure outlined above, it’s time to go through the joinery for the leg connections to the seat. The traditional and in my opinion best method is using a tapered tenon on the end of each leg and reaming out the holes in the seat to accept the tapered tenon on the leg. From a structural perspective, this is simply the best method to connect legs to a seat.
This process requires a specialty tool called a reamer. I purchased a 6 degree reamer from Tim Manney. You can watch the entire process of reaming the seat holes using a tapered reamer here, so I will not go through it. Below are photos I took of the process for your reference.


With the holes drilled and reamed, it is now time to rough shape or relieve the seat. Since there is no point in reinventing the wheel you can watch the entire process and the hand tools used documented by Peter Galbert here. In the video Pete is shaping a pine seat which is very soft and cuts like butter with sharp tools.
The white oak I used for my stool seats is very hard and in some areas highly figured so I admit that I shaped a majority of my seats using a medium grit Kutzall disk and a grinder. Even though I used a different set of tools, I followed the same process of cutting out the bowl and working the shapes together in the same manner. I have to be efficient in order to make a living! Here are photos of my seats after rough shaping and some sanding.
So at this point in the construction process I turn my attention to the legs. First thing I do is check to make sure that my leg blanks have not twisted or warped too much. I normally have no issues with this due to the nature of my air-dried and straight grained stock. If I do get excessive movement, I will machine the blanks to square again using my jointer and planer.
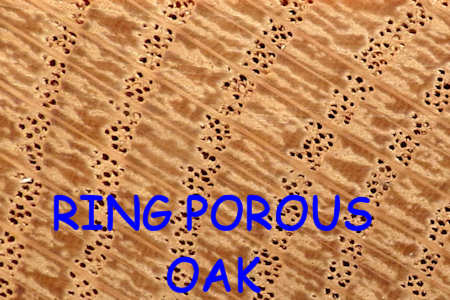
I mentioned above that I would point out some properties of turning ring porous woods like oak. The primary issue of turning these species is the potential for severe tear out when initially turning the square blank into round. In a tree each growth season produces early growth and late growth wood. In ring porous species, the early growth wood of each season produces a very porous material that is prone to fracturing when hogging away the square edges. The photos below illustrate the difference.

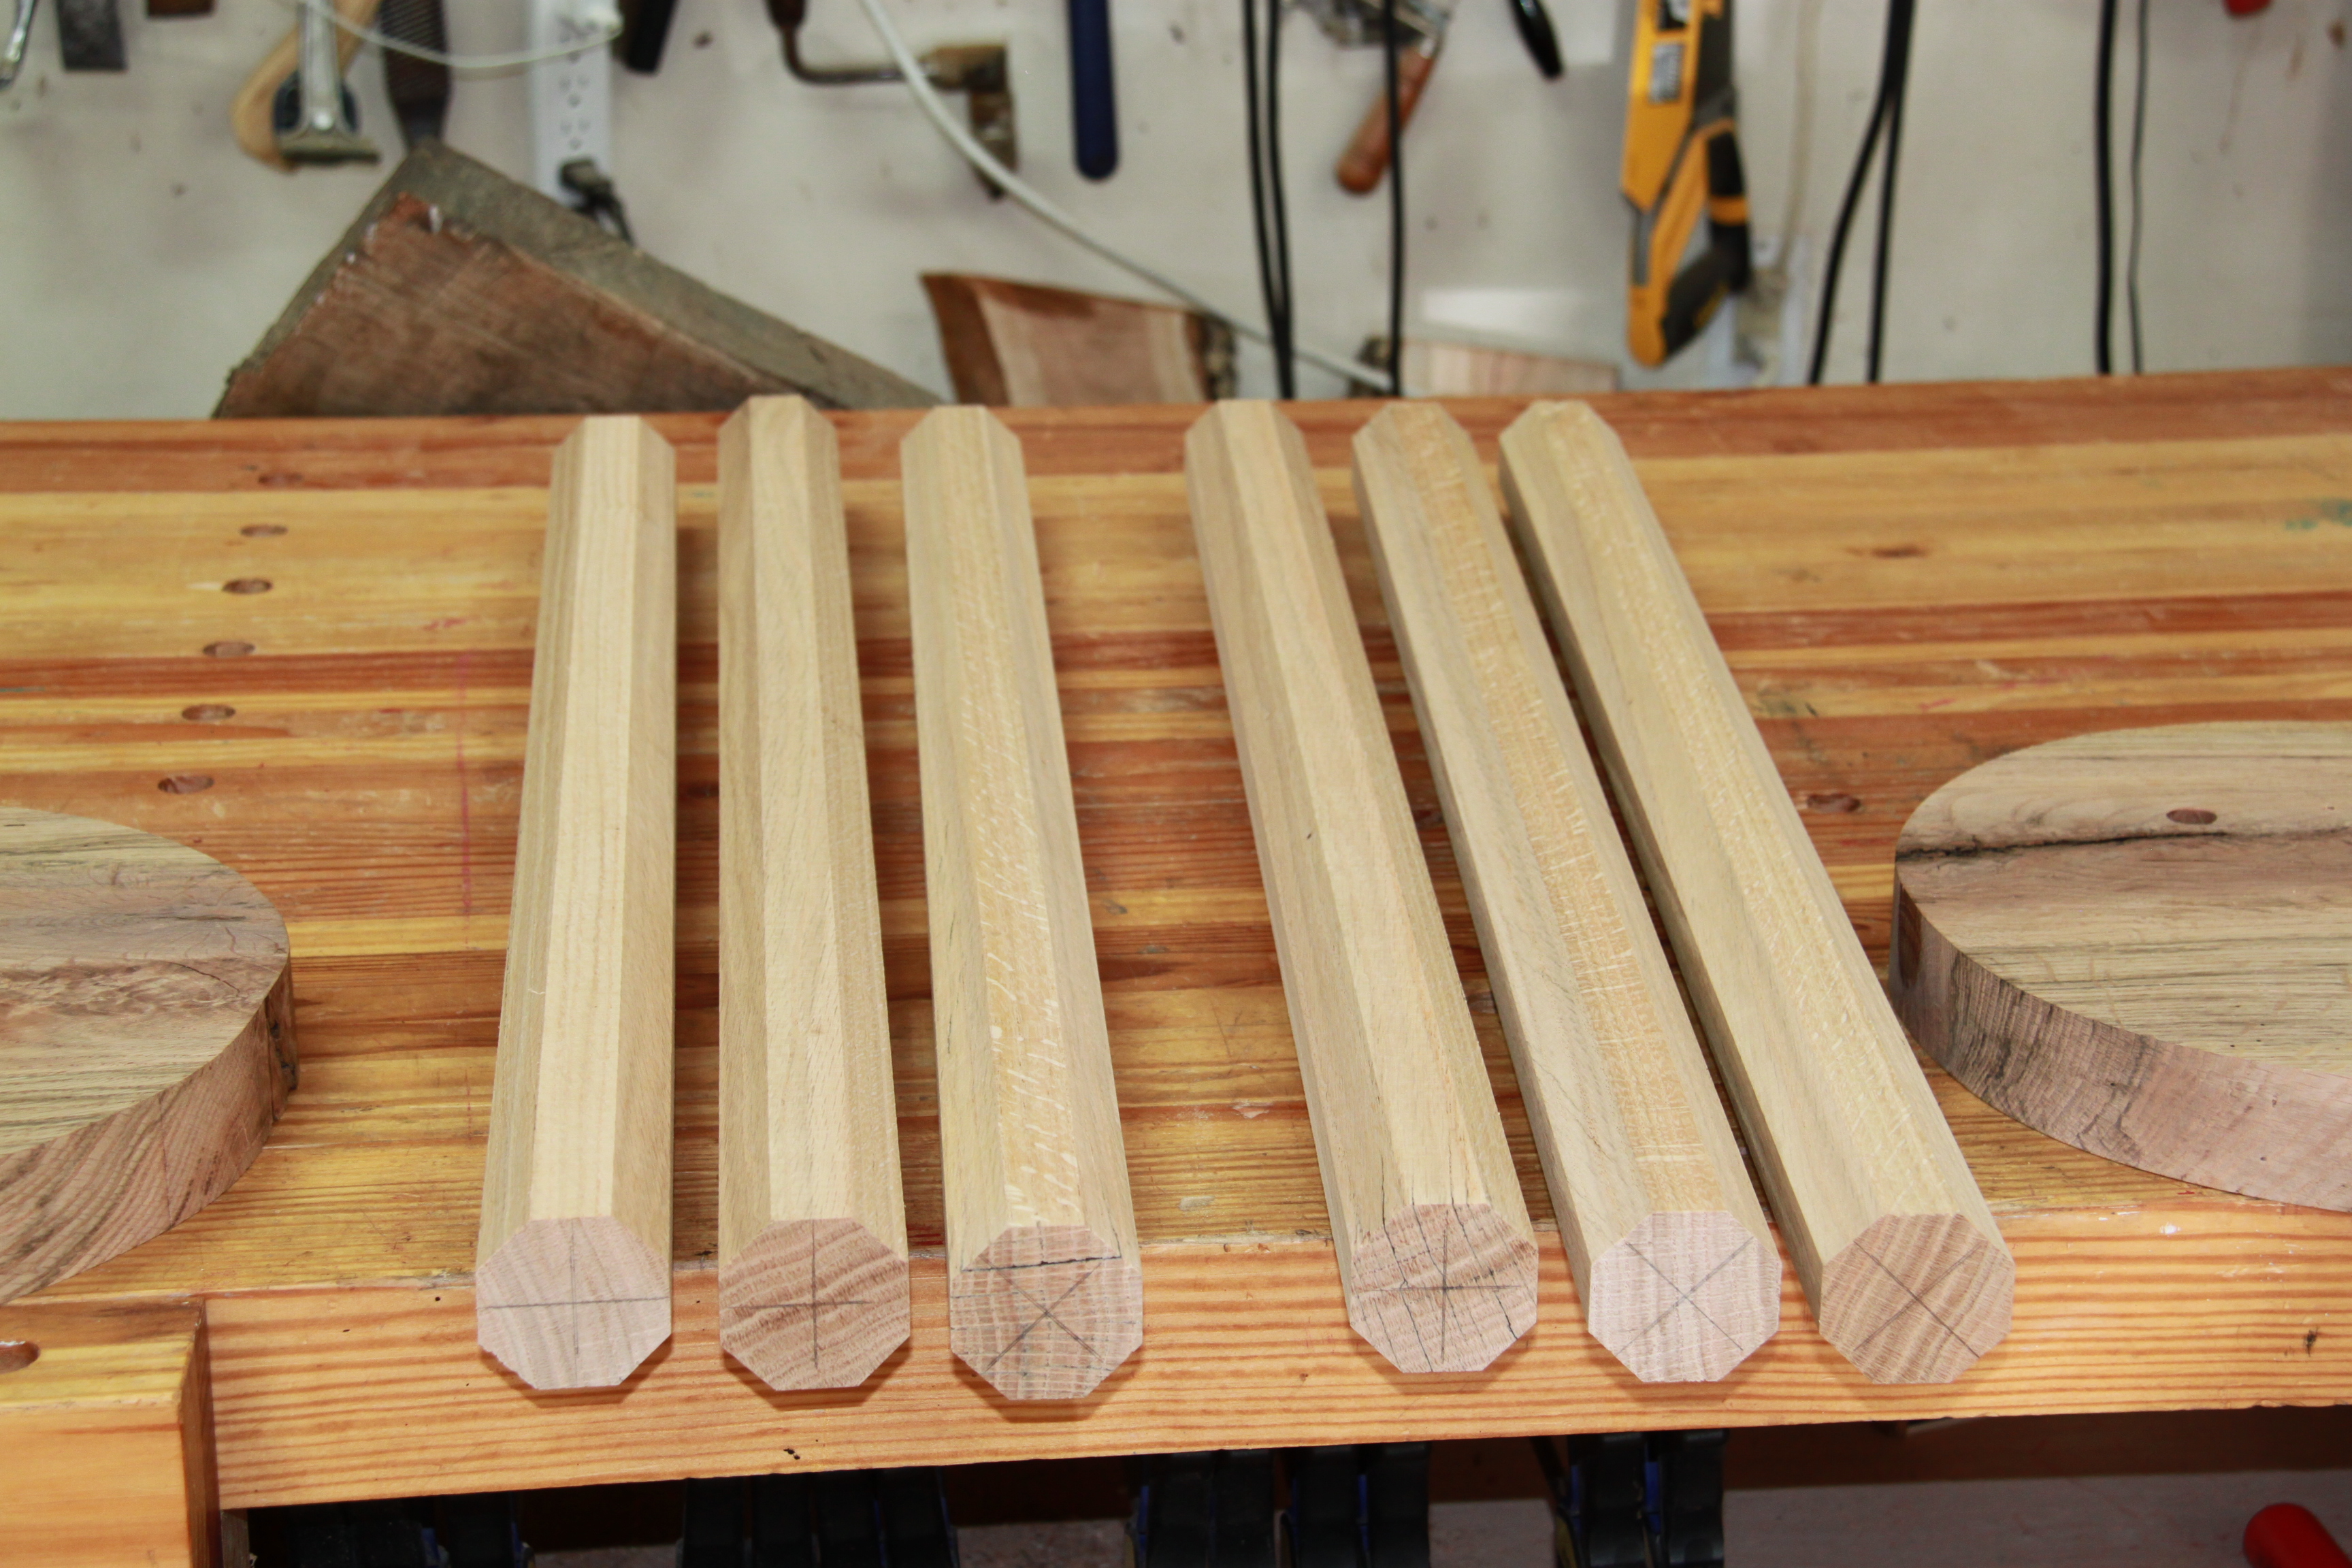
To alleviate tear out during the initial rounding of the legs and stretchers, I use a simple jig on the bandsaw to turn the square blanks into octagons. The jig is a block of wood with a stop on one end and a 90 degree v-notch that cradles the square blanks while cutting off the 4 outside corners. I draw out an octagon on one of the blanks and mark the centers on both ends of each blank before cutting off the 4 corners.
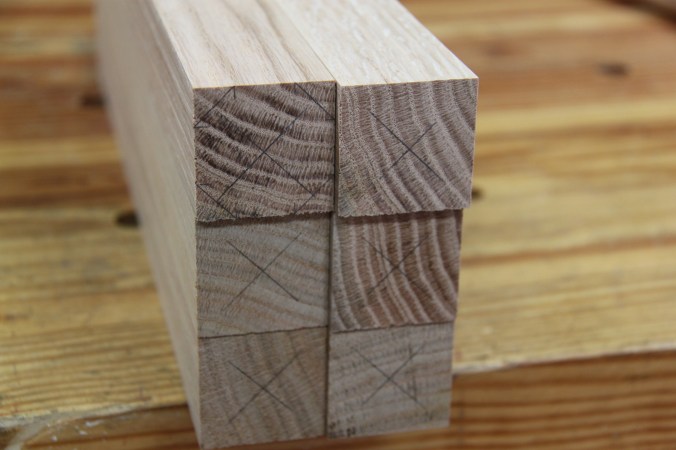
Square Blanks with centers marked. Note the octagon laid out on the top left blank
Below is the jig setup on the bandsaw, I align the jig so that my bandsaw blade just kissing the edges of the octagon, set a magnetic feather board to keep the jig against the fence and cut the edges off the blanks.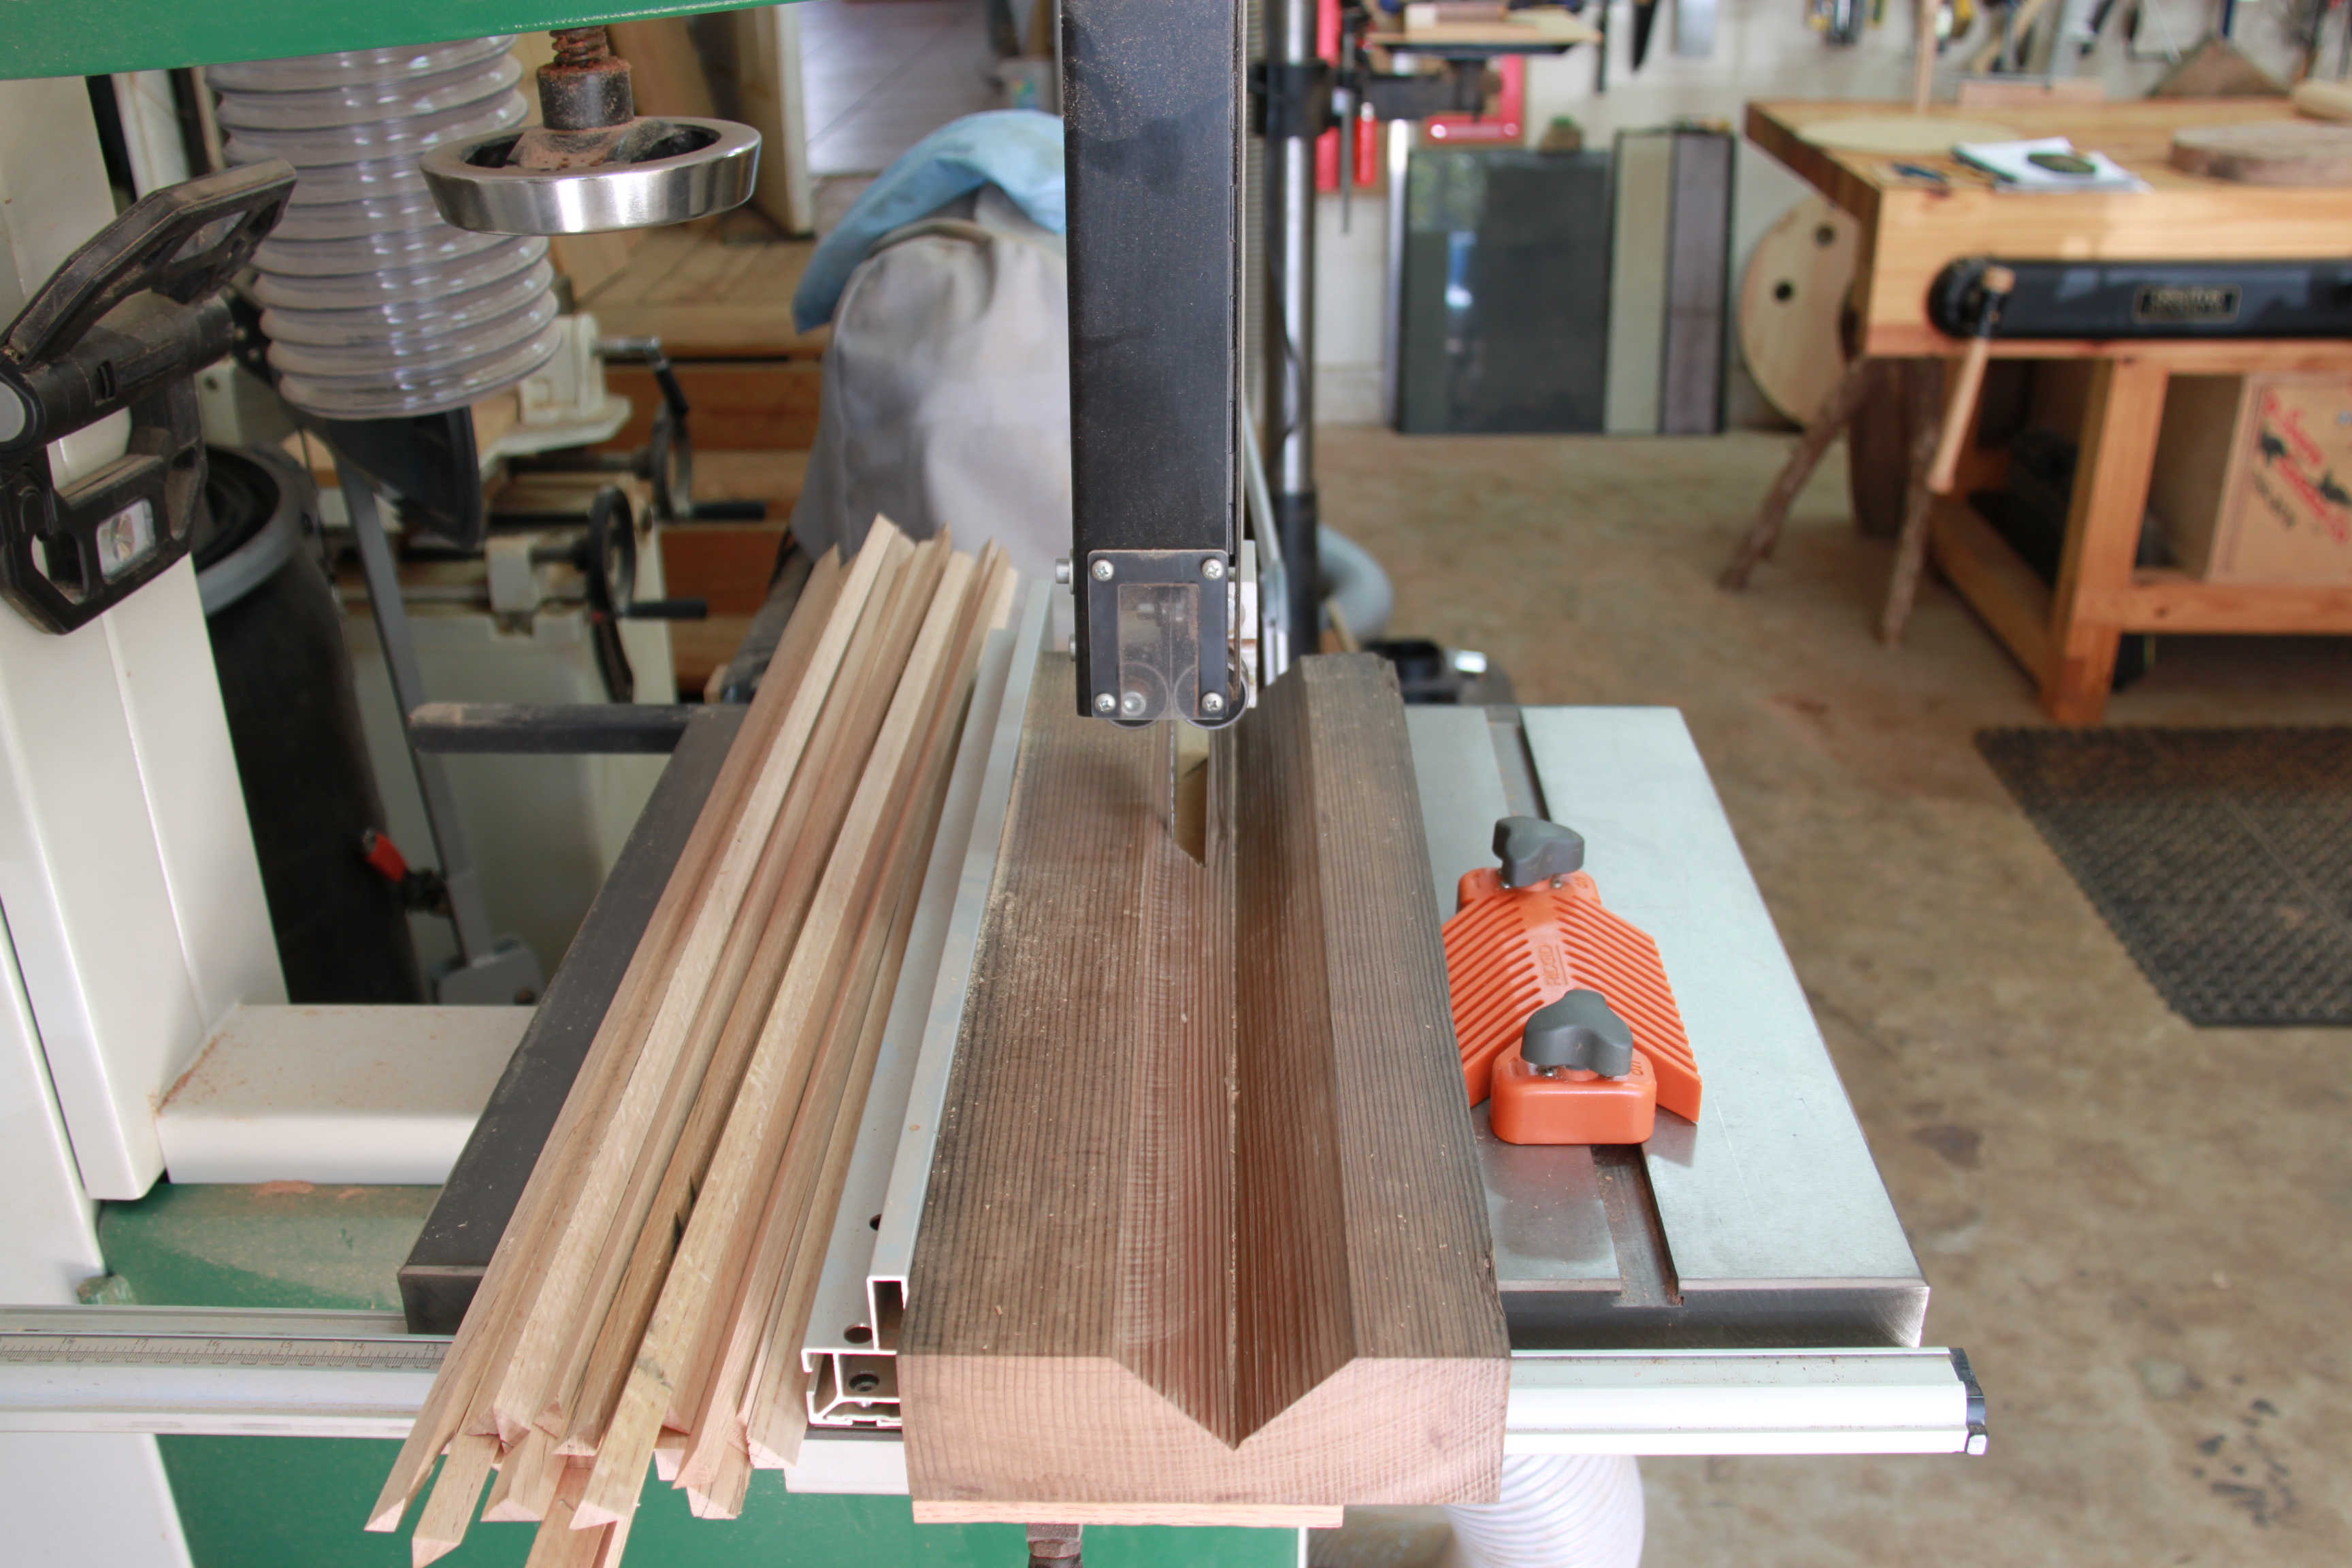 h
h
Here are the blanks cut into octagons with the centers marked.
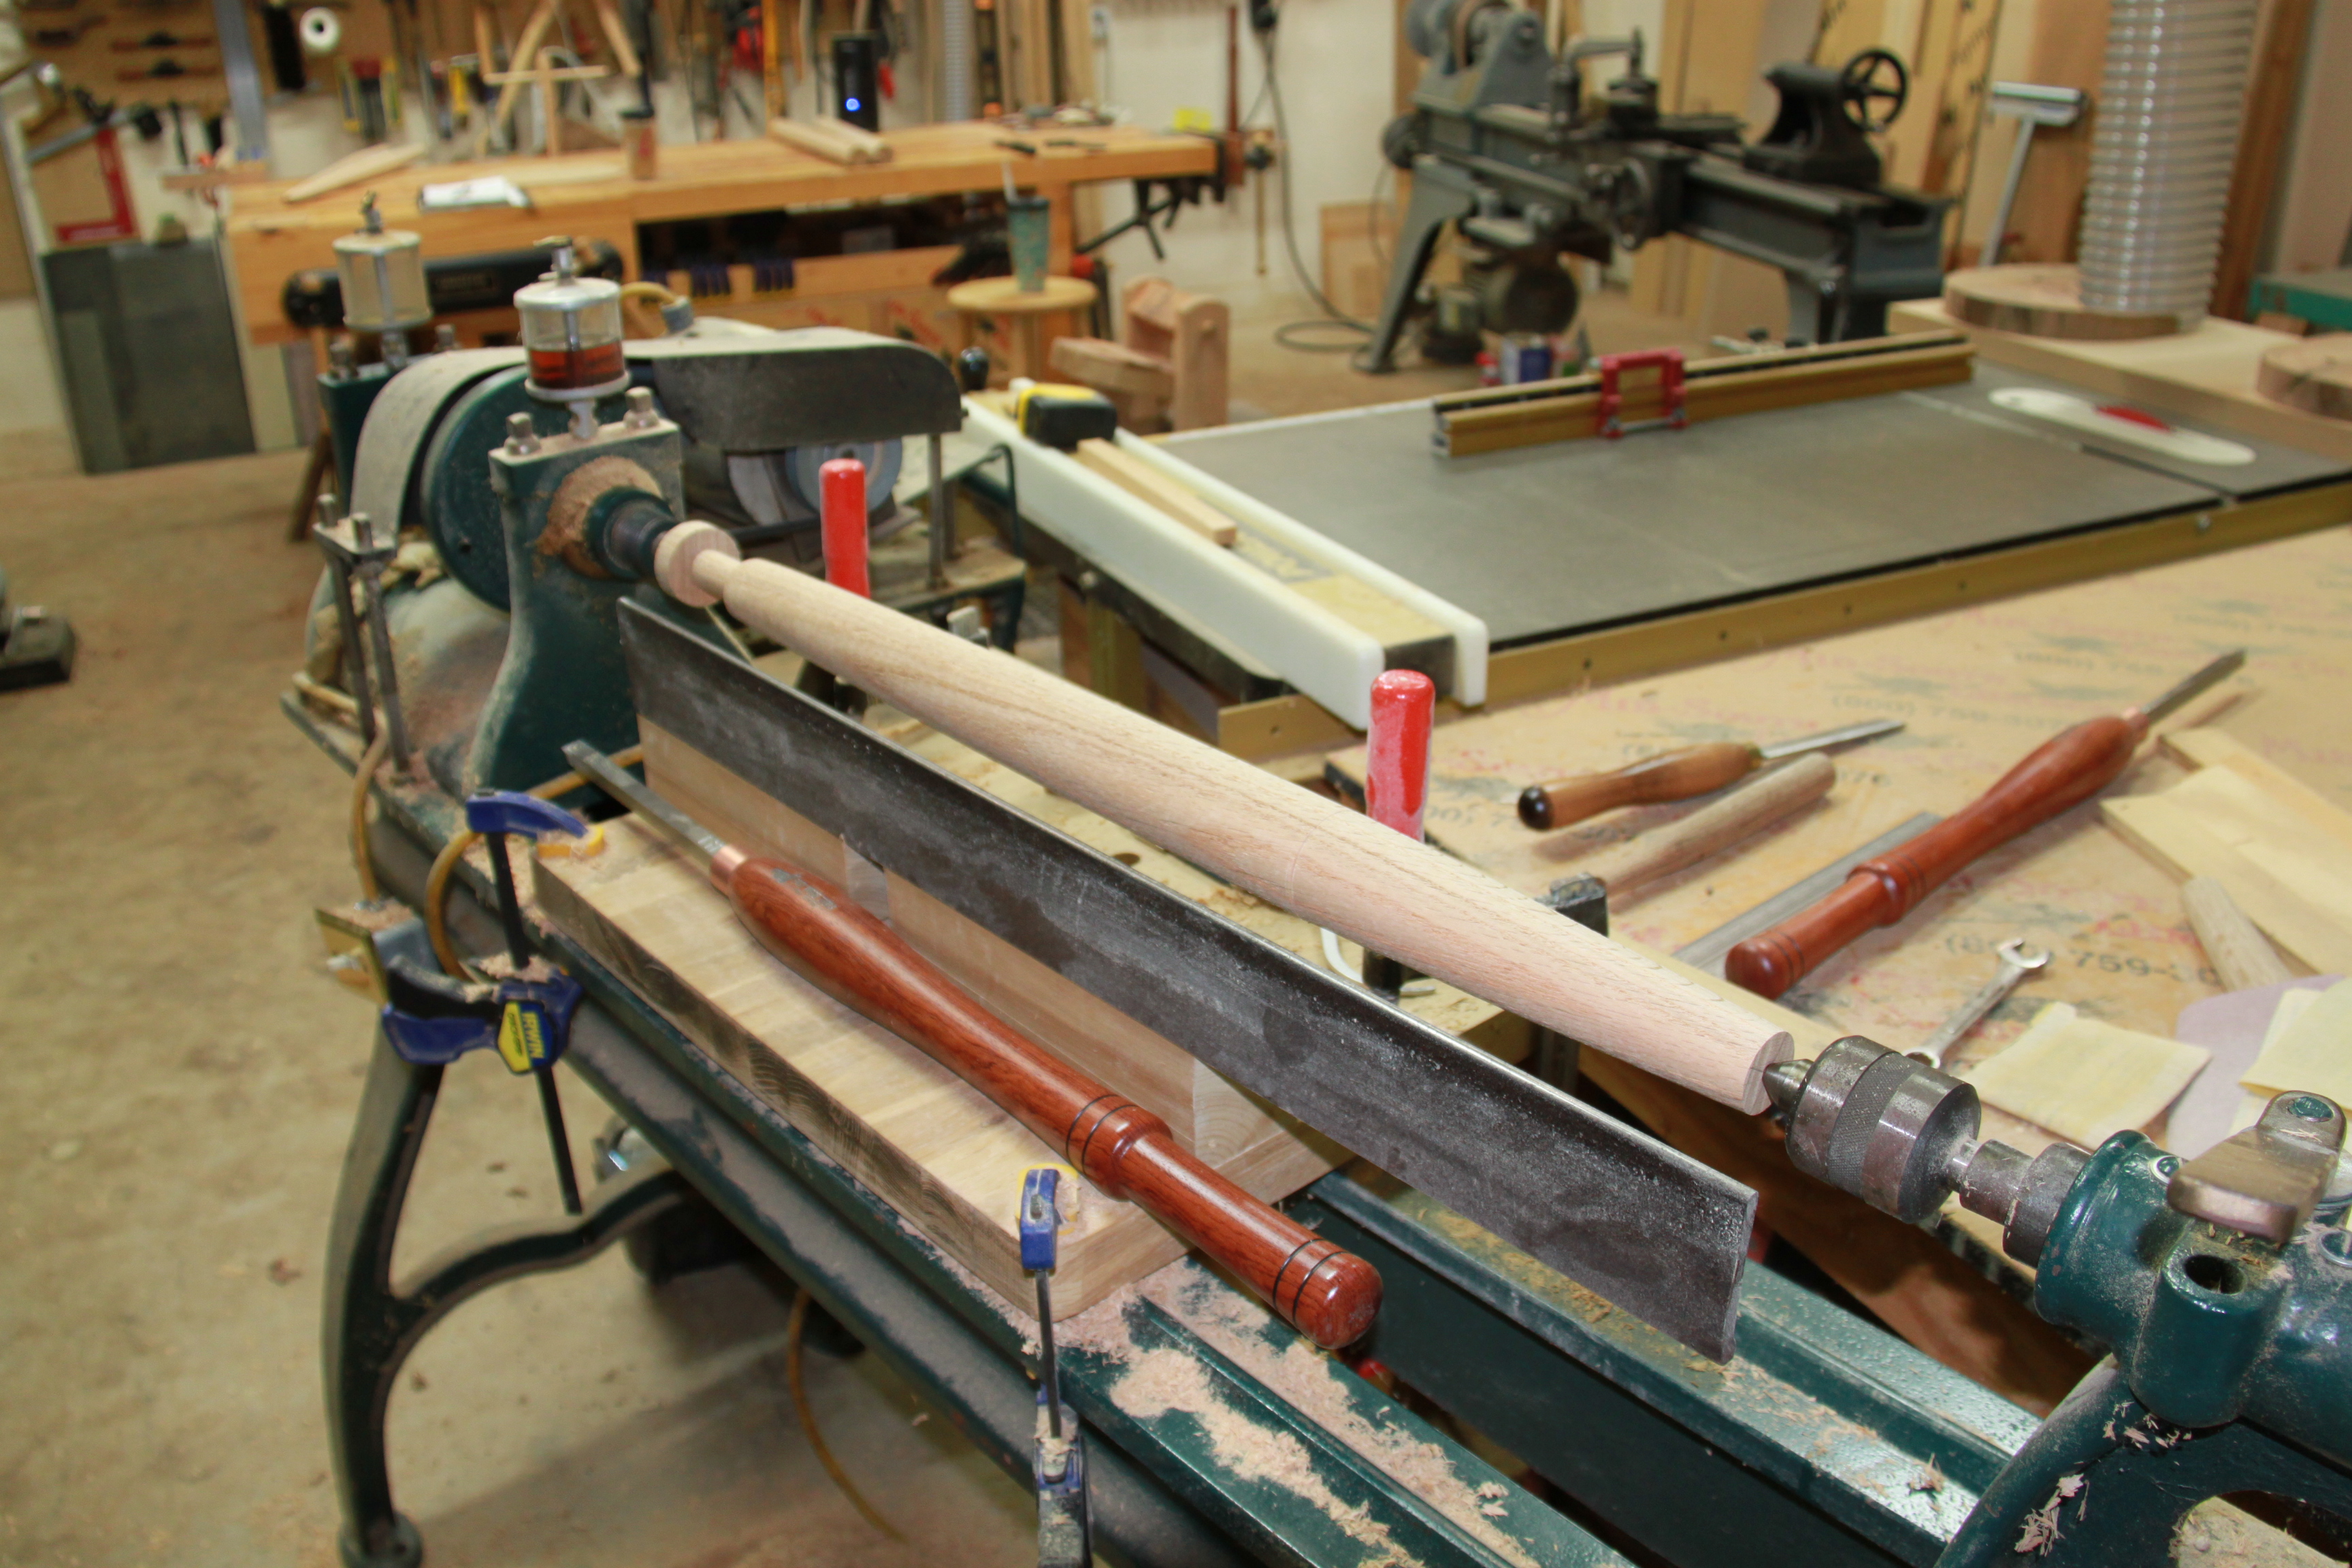
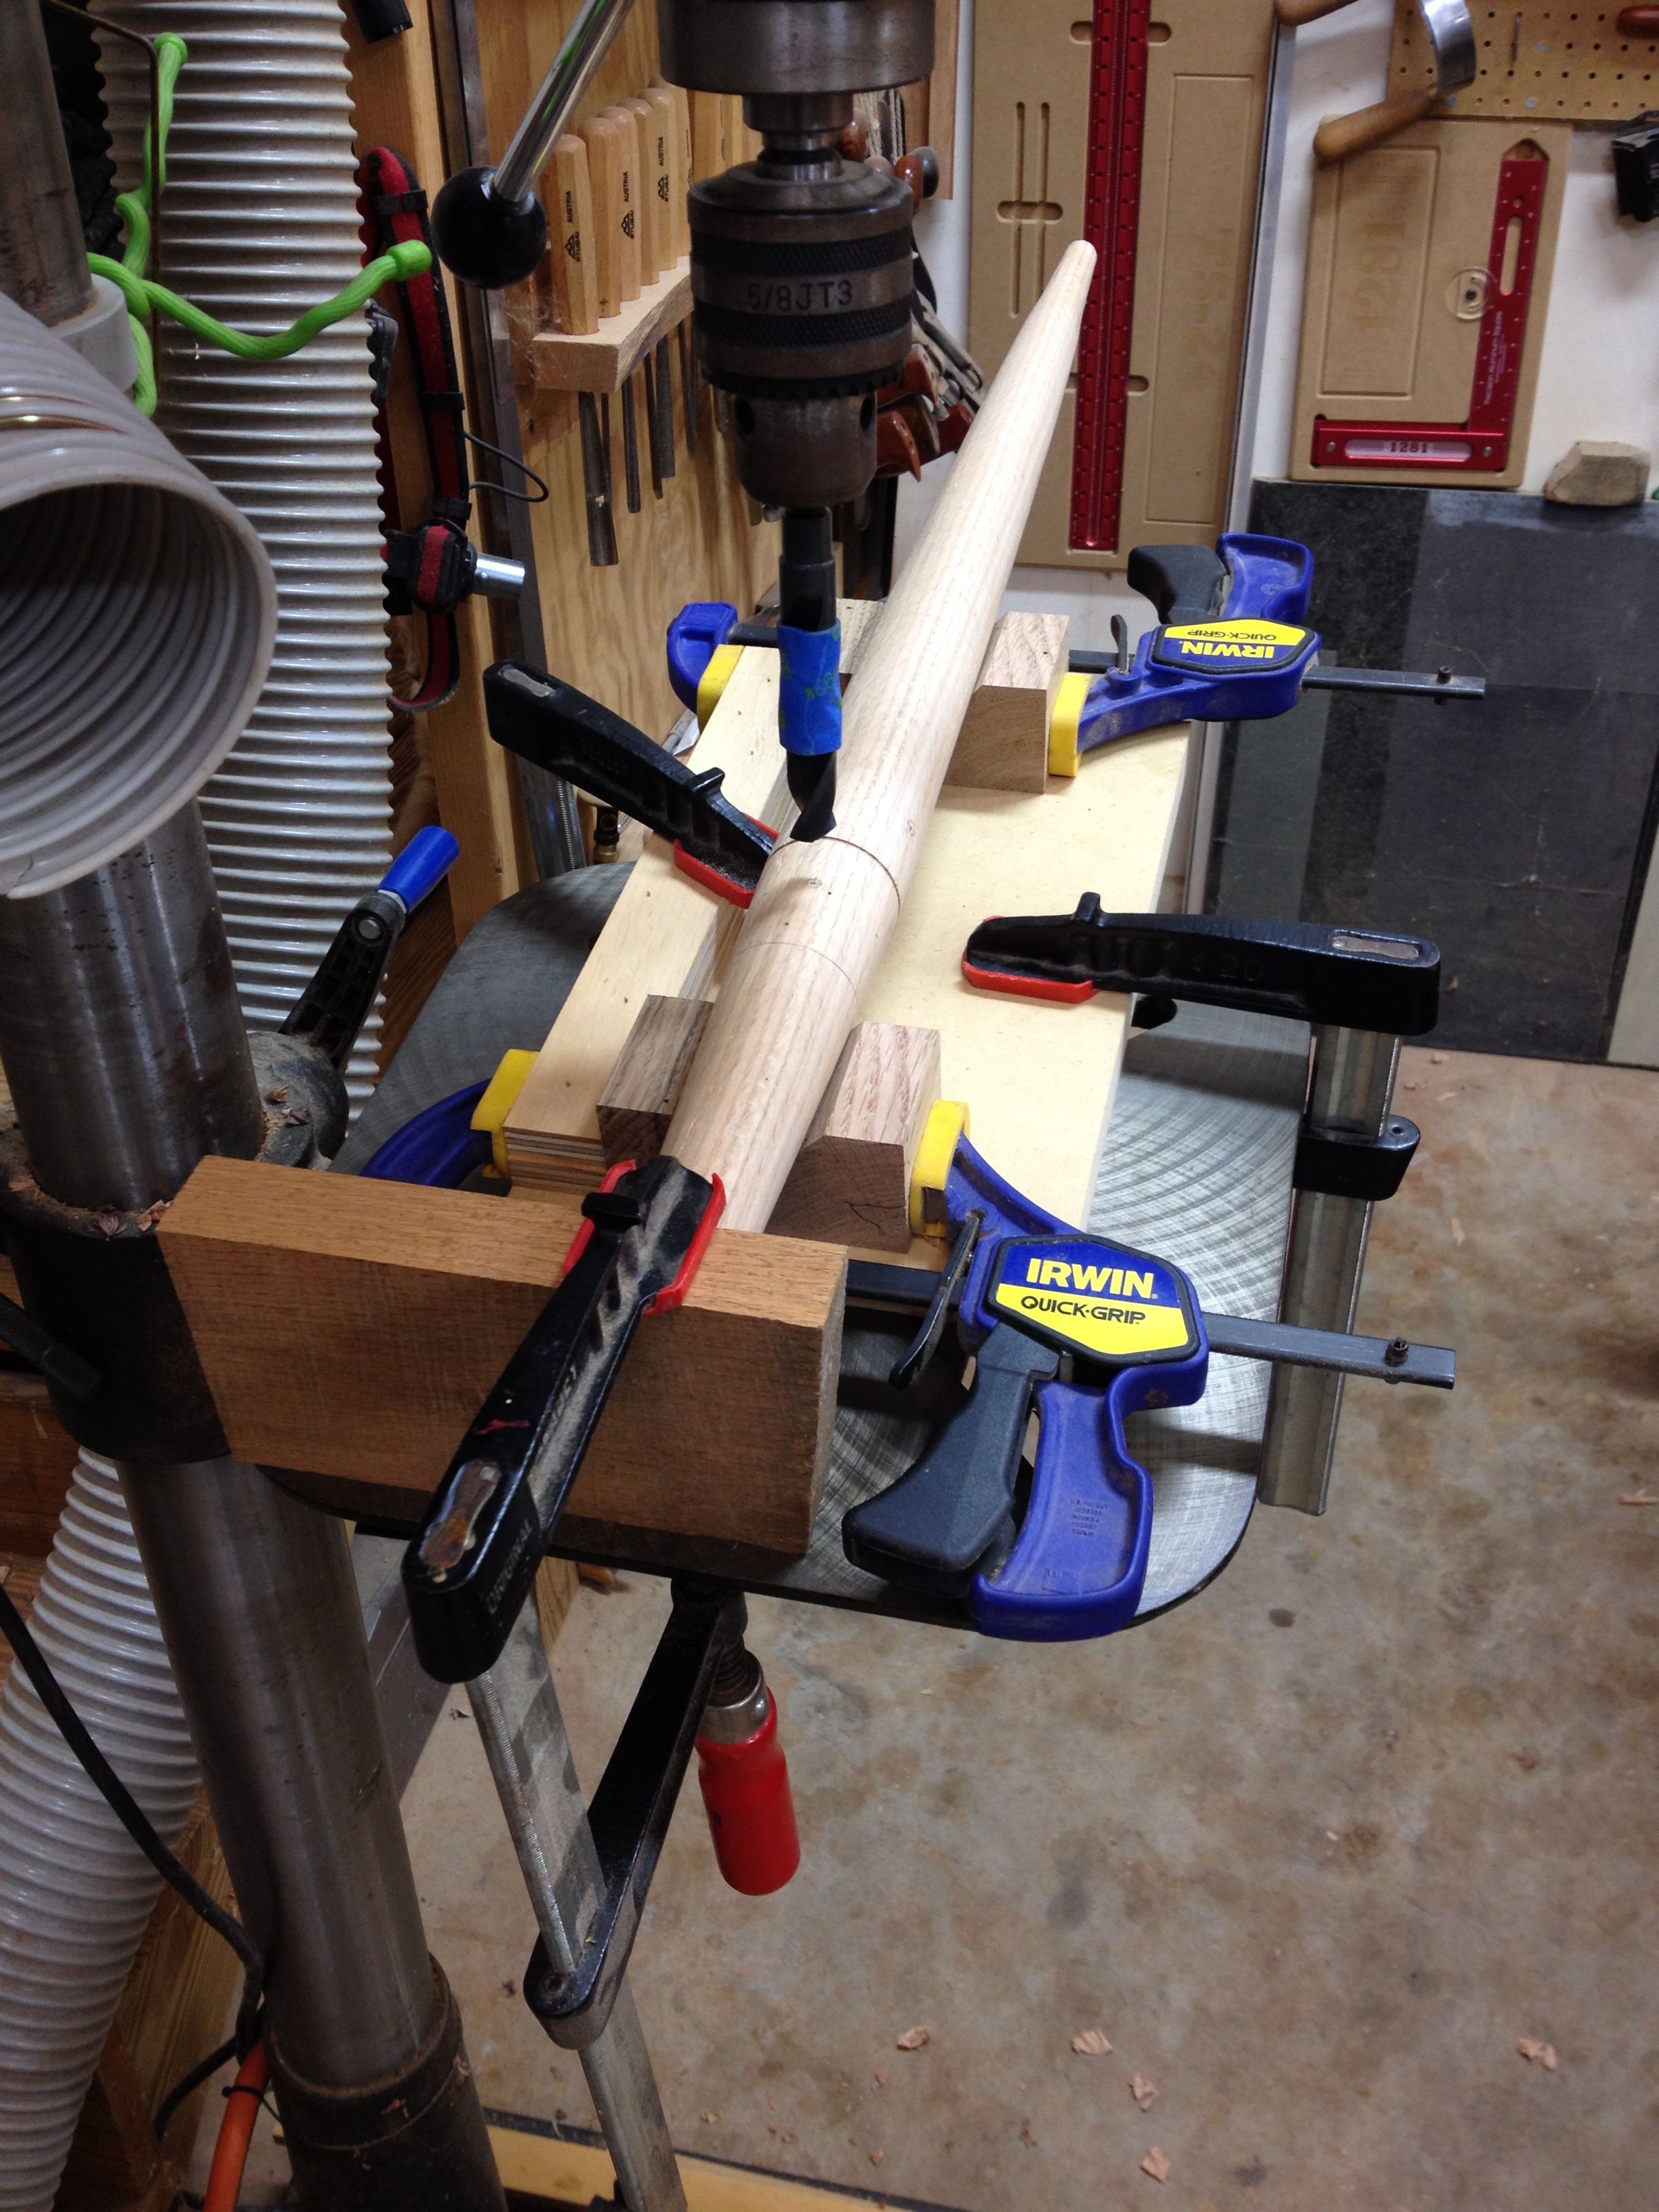
At this point I mount the blanks in the lathe and turn the octagon into a cylinder of the desired diameter. For these tall stools I was shooting for a 2″ diameter cylinder. Once I have the blank round, I use my leg pattern to mark the top (also the end of the finished tenon), the bottom of the tenon is 2″ from the top, the bottom of the leg, and transition point where the leg is at the widest point. This transition is 8-1/2″ from the bottom of the leg and I turn a small bead at this location to later locate the rear stretcher and for decorative purposes.
I first turn the bottom of each leg down to 1-1/4″ and taper from the transition to the bottom. I then rough turn the tenon down to about 15/16″, then using a sharp skew I knife a small line at the bottom or “shoulder” of the tenon. You can see in the photo below the bottom taper has been turned and the tenon has been rough shaped.


At this point I turn my attention to refining and dialing in the final tenon to a 6 degree taper to match the 6 degree reamed holes in the seat. You could turn the tenon on the lathe but there is an easier and more accurate way to do it. I finish the tenon shaping on a simple jig that I built from instruction provided by Tim Manney. Here are photos of the jig I built. It works brilliantly and gives you a perfect tenon every time. I turn the leg clockwise in the jig until I work my way up to the knife line I marked with the skew on the lathe.


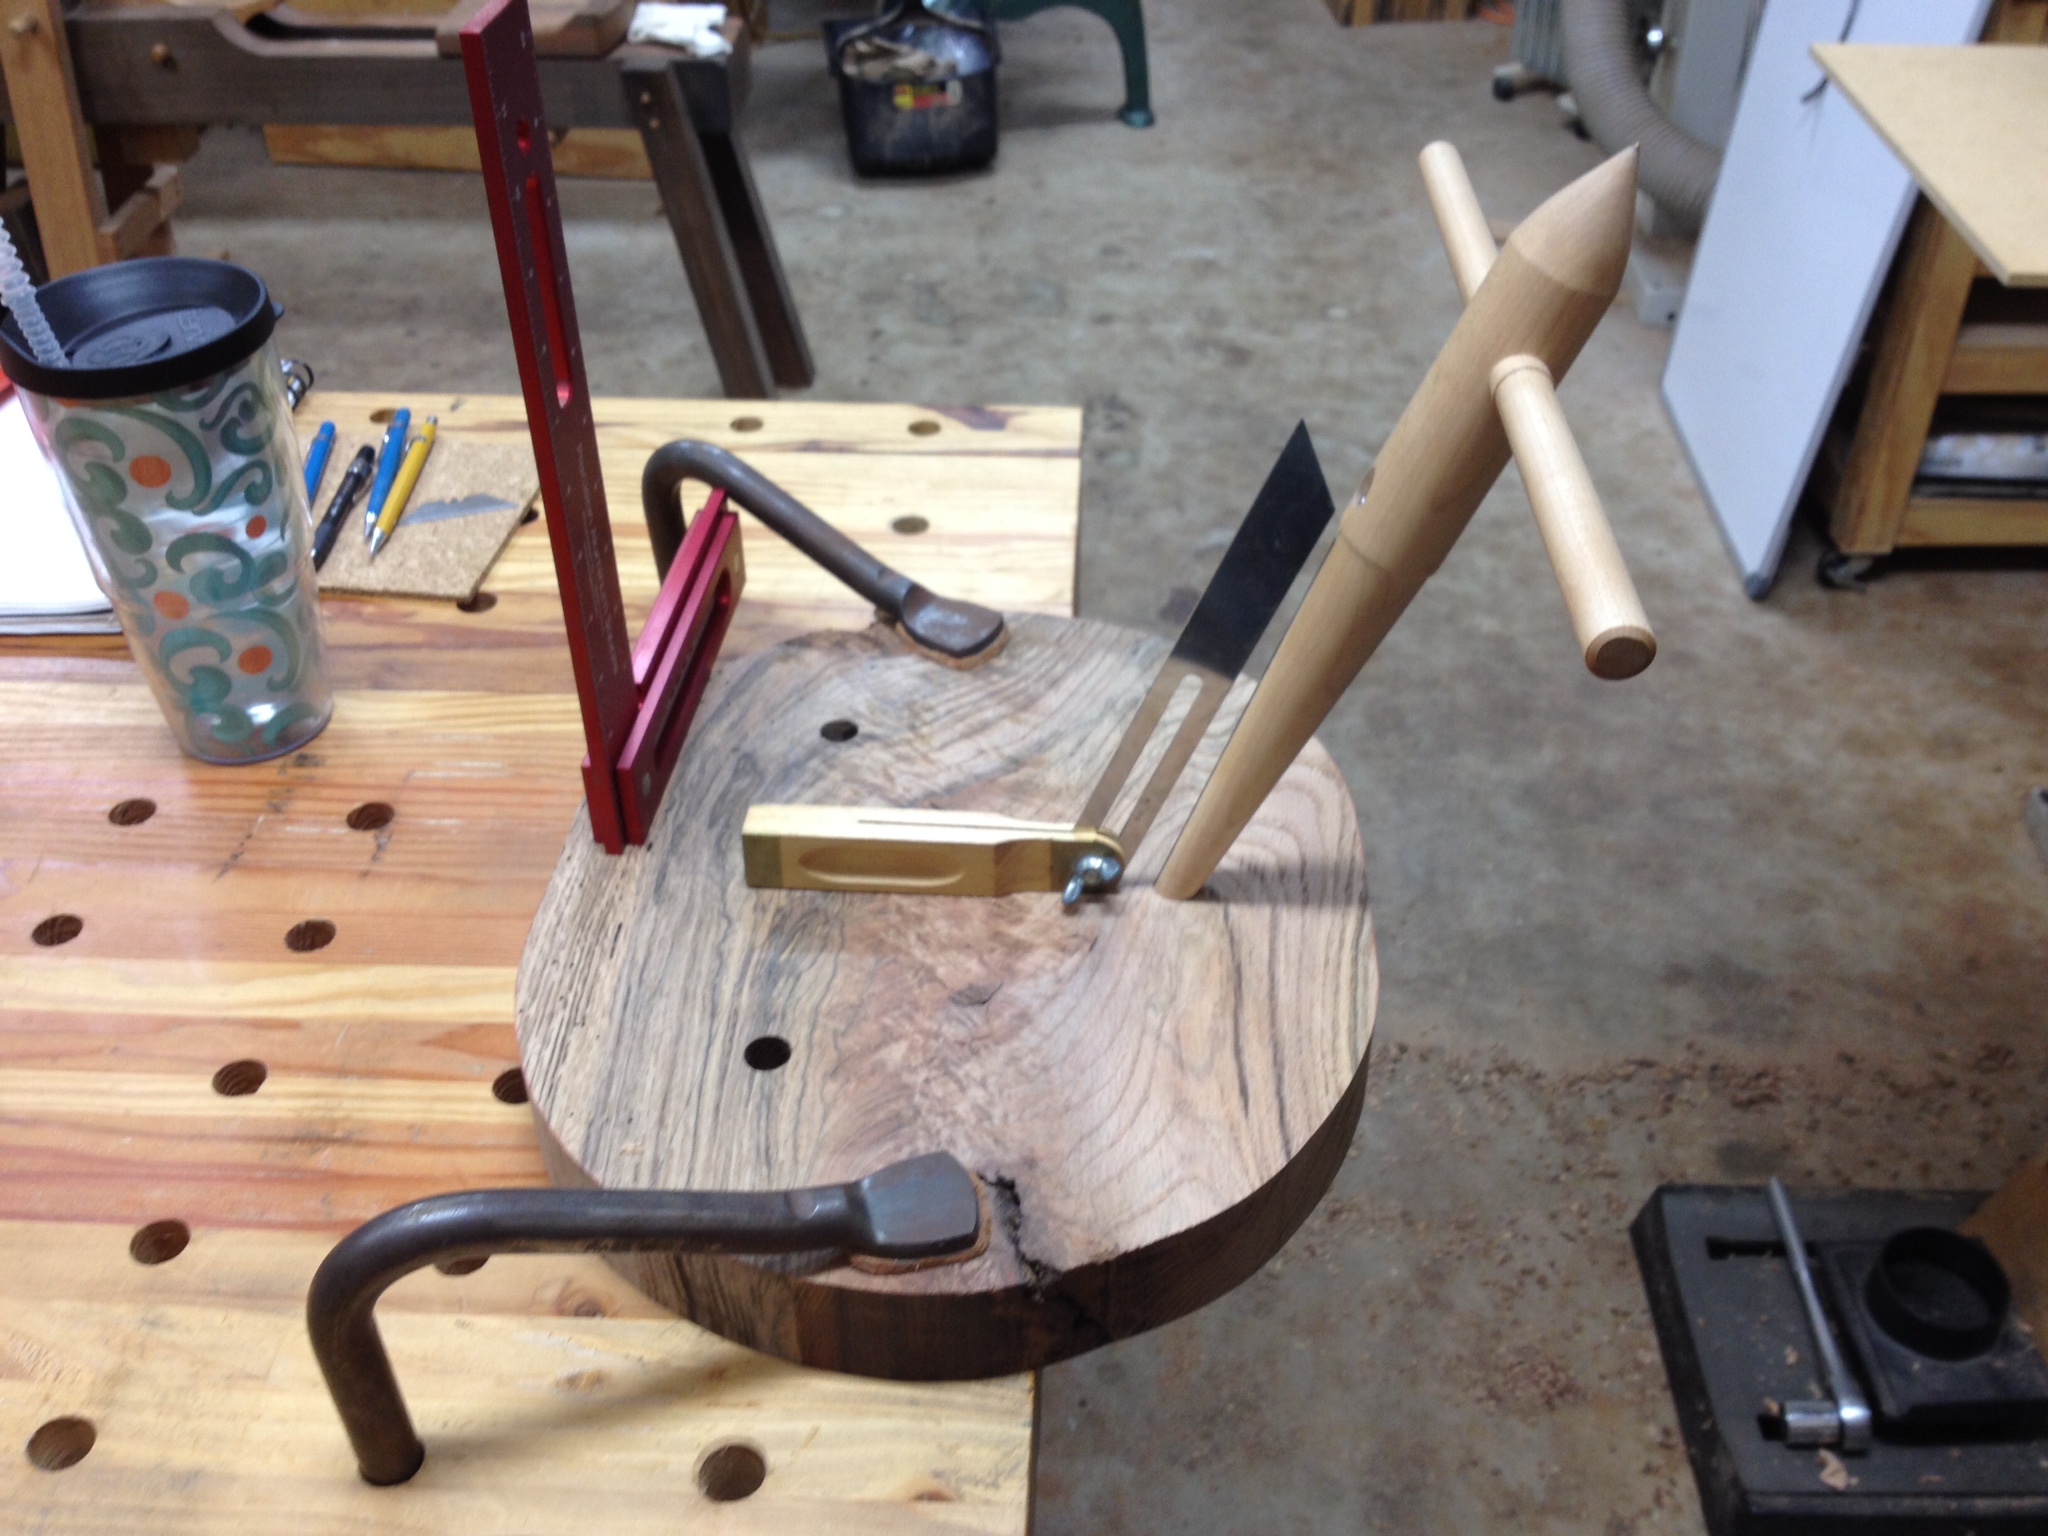
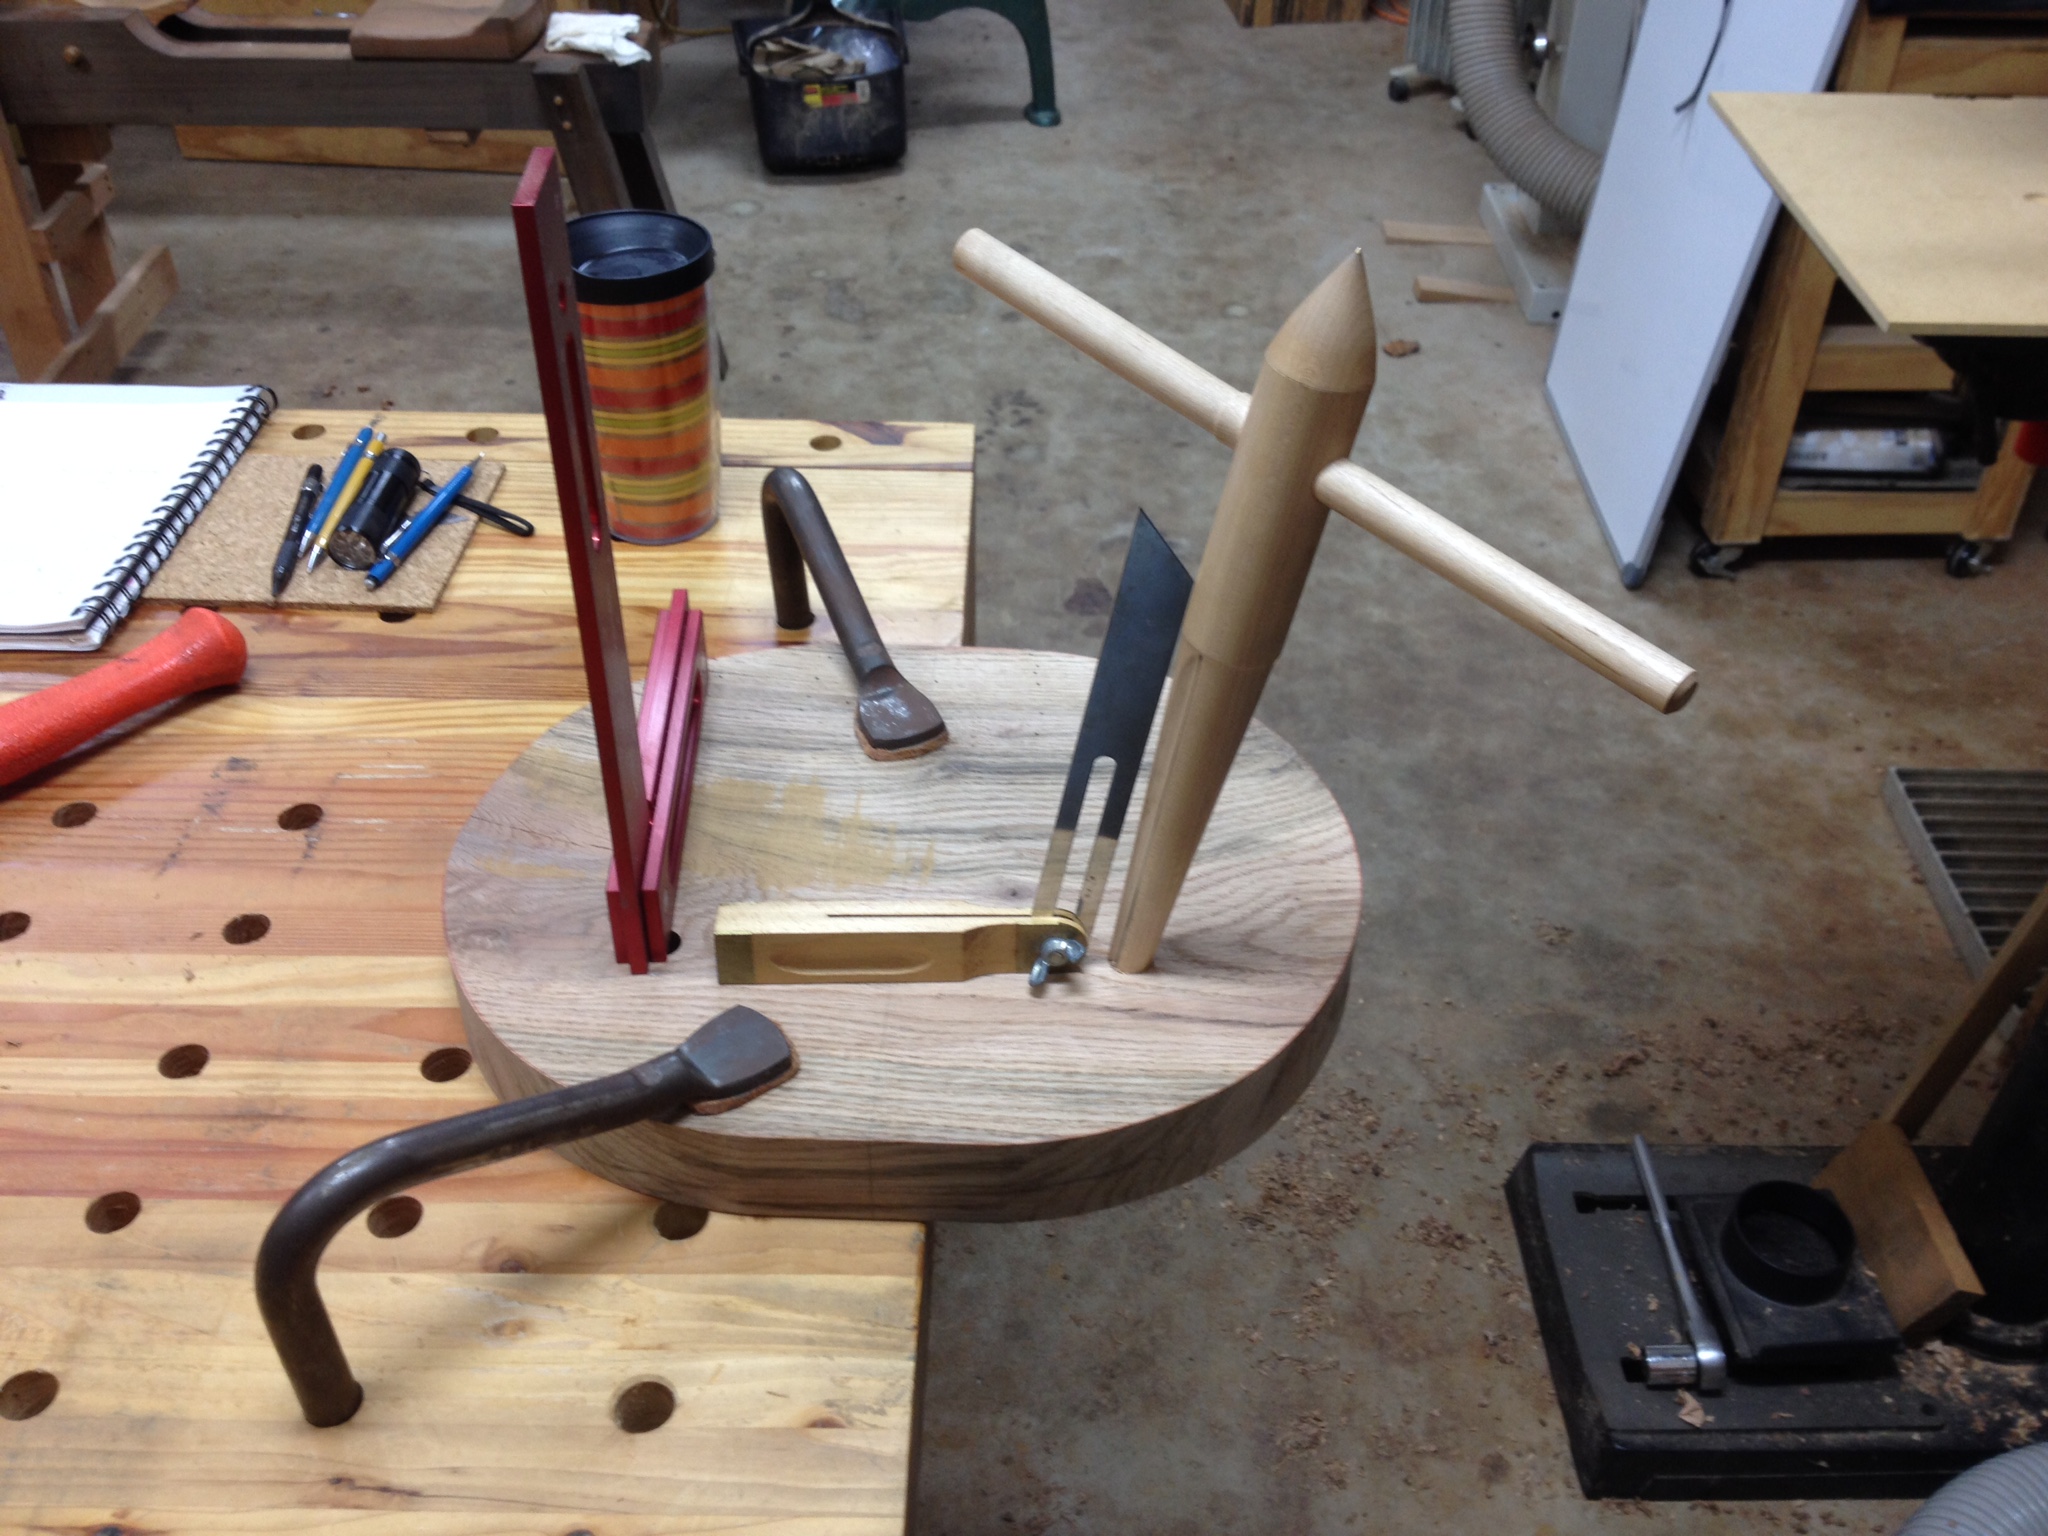
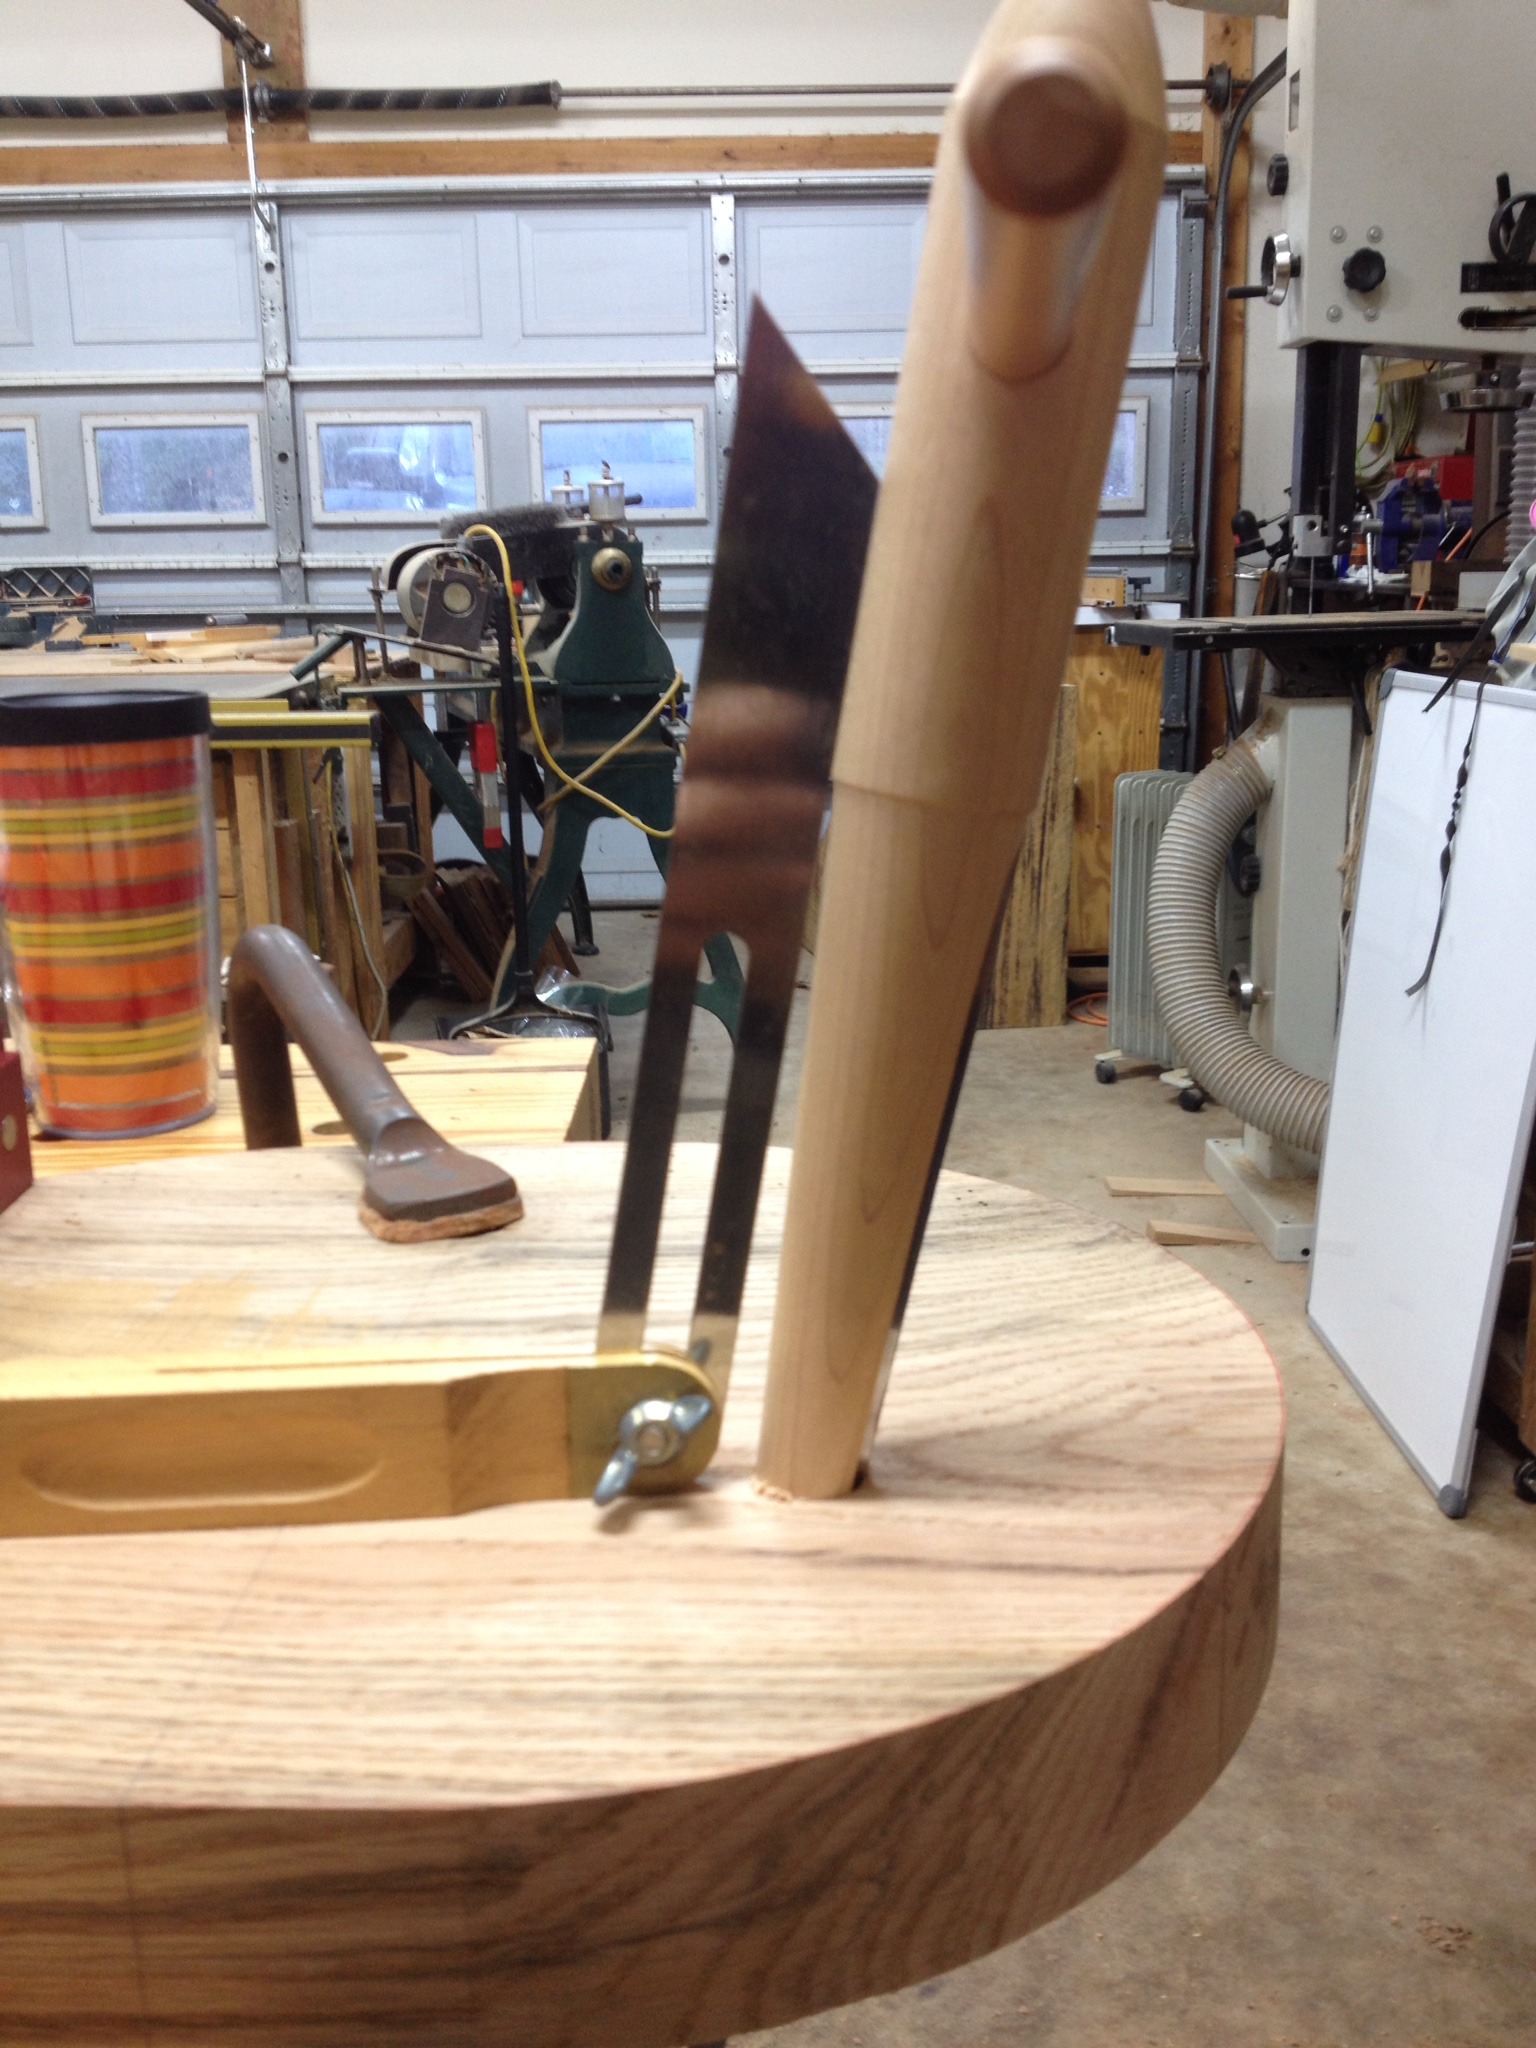
With the legs finished I then insert them in the seat and begin the layout and measuring procedure for the 3 stretchers. Since it would be difficult to describe the process for laying out, marking, and measuring the length of the stretchers in writing, I produced the following video that will walk you through the entire process step by step.
If you have any questions about the information presented in the video please contact me via email and I would be happy to clarify any information for you.
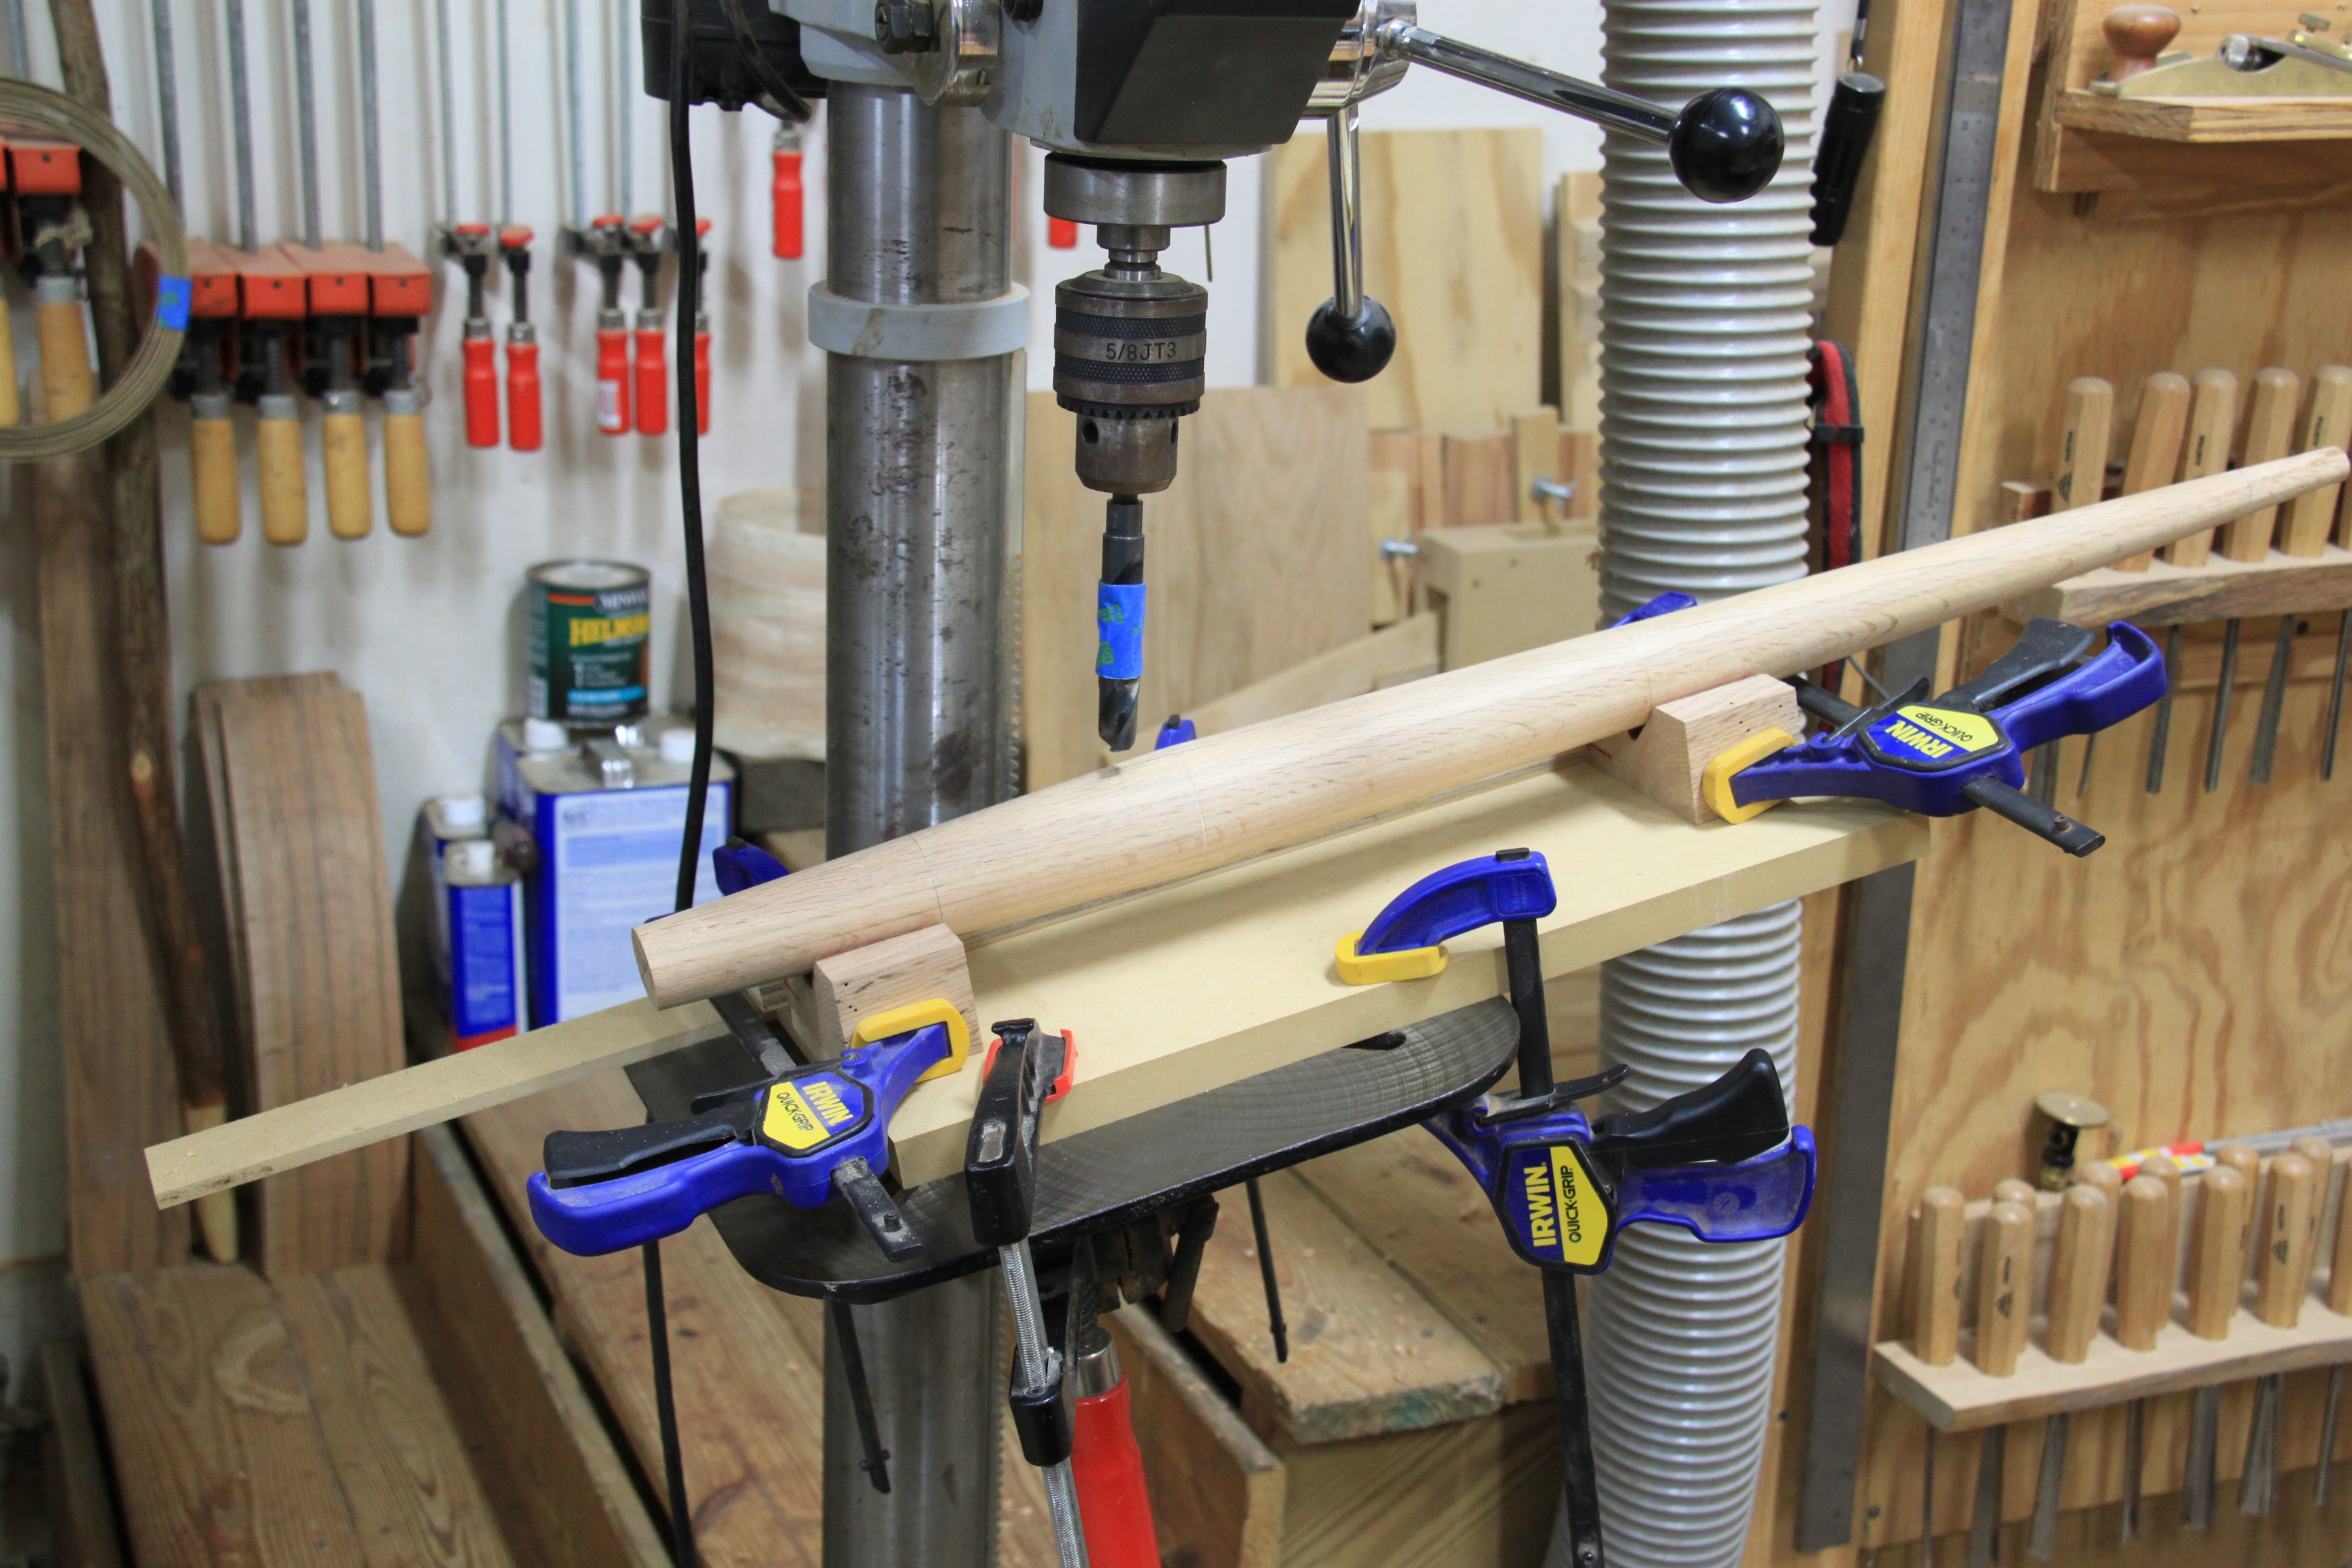
With the stretcher center points now laid out I can turn my attention to drilling the 5/8″ diameter mortises into the legs. Again, this can be accomplished in a number of ways. I use a simple jig and the drill press to hold and drill the mortises cleanly and accurately. The following video covers the jig.
If you have any questions about the information presented in the video please contact me via email and I would be happy to clarify any information for you.
Here are photos of the legs in the jig, mounted on the drill press. Since the average drilling angle for the stretcher mortises was the same for both stools I can tilt my drill press table to 11.5 degrees and go to town on all 12 holes. Note that I use tape on the drill bit in order to drill each mortise to a depth of 1-1/8″. I also use a small fence behind the jig to register the jig each time I move the assembly to drill each hole.


With all the mortises drilled and the final lengths of each stretcher already determined, I turn the stretchers blanks that have already been drying for at least a week. The process is similar to the legs but I will go over each step.
I first cut the square blanks into octagons using the bandsaw jig the same way I processed the leg blanks. I then mount each blank on the lathe and turn them round to +/-1-1/2″ diameter. Once round, I mark the center line of the stretcher, the ends of the stretcher tenons, and the shoulder lines of the tenons using a pencil. Each tenon is 1-1/8″ long.

octagon shaped blank mounted in the lathe
The following photo shows a stretcher blank mounted in the lathe. Note the washers I have place over the live center on the tailstock. These washers prevent the live center’s cone from splitting the wood. You could buy a special live center to do this but the washers work just as well.
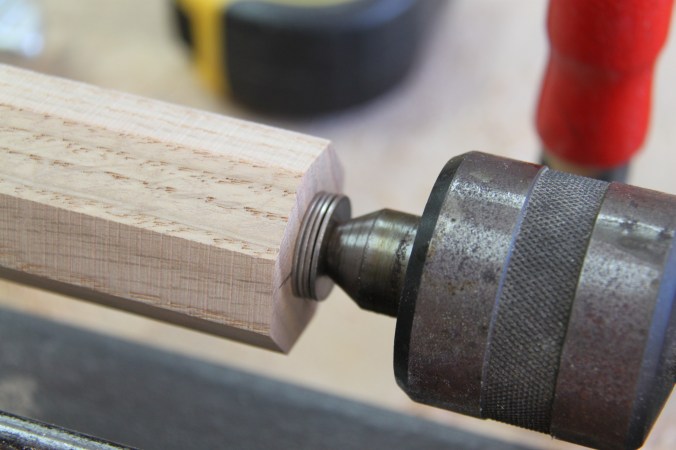
I then start the final turning of each stretcher by cutting the tenons on each end first. The key to getting the optimum strength from a round tenon and mortise is the fit of the joint. To obtain an absolutely perfect fit I took a 9/16″ wrench that I filed to an exact width of .625″ or 5/8″, which I verified by using my dial calipers. This diameter matches my drill bit precisely.
I carefully turn the tenons down until this wrench slips over the tenon, slightly compressing the wood fibers on the tenon. Once the diameter of the tenon is dialed in, I use a skew to precisely mark the ends and shoulders of the tenons. Keep in mind that the stretcher blanks are bone dry. When I insert the stretcher tenons into the leg mortises with glue the tenons will swell several thousandths of an inch, locking themselves into the mortises and creating a very strong connection. The final turning step is to taper each side of the stretcher from the center down to the shoulder of the tenon.

rounded stretcher blank with the centerline and tenons carefully marked out


The friction fit of the wrench on the tenon. The fit should be tight enough to hold the wrench upright without falling off


This photo captures the knife line I marked with the skew. I use this line for two purposes. One is to feather in the taper from the center of the stretcher to the tenon and second to visually check that each tenon is completely inserted to the mortise when I assemble the stool


With the stretchers turned, the stool is ready final assembly!!! I will be posting a future video on the assembly and final shaping of the seat soon.
Thanks for hanging in there on this detailed post. Looking forward to completing this novel very soon.
